Showing posts with label VirtualBox. Show all posts

Monday, 27 October 2014

Remastering Tiny Core Linux

Tiny Core Linux is a lightweight Linux distribution designed for Live CD usage. Its low system requirements and small footprint also make it a good candidate for reviving older computers or as a base for building virtual machine appliances.

Unfortunately the remaster tool it includes, which is meant to allow for custom Live CDs to be created with chosen software pre-installed, seems to be buggy, and continually failed when I tried using it, so this is the alternative way I found to remaster TCL.

Step 1
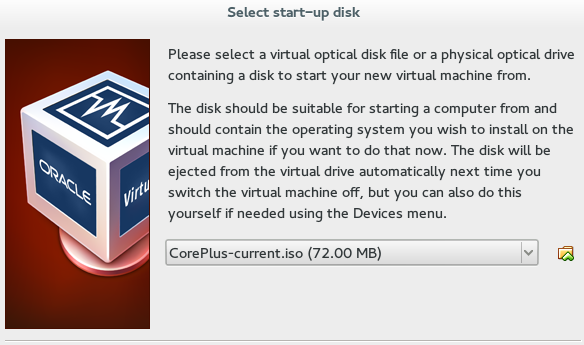
Create a basic virtual machine and boot with the TCL Live CD. I used the CorePlus-current.iso, which has some extra software on there, but is still sub 100MB.


Once it's booted to the desktop select TC Install.


Select USB-HDD, whole disk and 'sda' options on the first screen.

Click through the next two screens (formatting options and boot options)


On the install type I checked the Installer Application option as I might need it in my intended application later, but it's optional.

Click through to the next screen where you're selected options will be repeated back to you, and select Proceed.

When it's done installing, shutdown the VM, remove the Live CD image and restart, so that it boots from the HD.


Step 2
Go to apps, and install the software that you require. In my case I installed Open JDK and Filezilla. (Filezilla also requires libiconv to be installed)


Reboot using the TC Exit options (from the menu go to Logout). The backup options there will essentially create a blank mydata.tgz file structure for you to use later.

Once rebooted, copy the /mnt/sda/tce1 folder off the VM to the host system/memory stick whatever (As I installed filezilla I FTP'd it to another server on my network.)

Step 3 (Optional)
On the host system, edit the mydata.tgz that you copied over, and add in any necessary files that you want on the Live CD. Thanks to the reboot that you did in step 2, mydata.tgz will have a basic file structure in place, that maps to the home and opt directories of the live CD. Also it puts in a couple of SH scripts, bootlocal.sh and shutdown.sh - these handle things that you want to execute on boot and shutdown respectively, edit those if you need to.

Step 4
Use an ISO editor (I used ISO Master).
Open the LiveCD, and navigate to it's 'cde' directory
Copy your mydata.tgz to the ISO, and replace its onboot.lst, and 'optional' directory with your own.

Navigate back to the ISOs /boot/isolinux directory and edit the isolinux.cfg file.
Find the line

TIMEOUT 600

This line causes it to sit on the bootloader screen for 60 seconds, unless the user selects and option.
I want my live CD to boot without user interaction, and that delay is redundant, so I edited it to

TIMEOUT 10

which allows a 1 second delay before continuing to boot the default option.


Save the edited ISO. To test, setup a blank VM like you did in step 1, and select the edited ISO as the boot medium. TCL should load, with your apps and files already there.

Thursday, 3 April 2014

Creating a VirtualBox test system for Raspberry Pi development


Firstly, I'm going to walk through the process of setting up a Ubuntu Virtual Machine (VM) on VirtualBox, which I will use as a test environment for developing for the Pi.

Download the Ubuntu ISO from here if need be.
With VirtualBox installed on your PC. Go to New, and walk through the wizard, allocating memory, and creating a virtual hard disk.

Once that's done, boot the machine, and you'll get a "first-run" type prompt, asking you to select an installation source - direct it to the ISO you downloaded earlier.

Once the VM boots, select Install to hard disk, and walk through the graphical wizard for that. Once complete, reboot the virtual machine.

Once rebooted, login, and open a terminal.
Follow the same instructions to update the system and install the LAMP stack as we did in the post about setting up the Pi.

Once that's done, the next step is to install the VirtualBox 'Guest Additions'. These allow easier interaction between your host system and the VM.
Select this from Devices -> Install guest additions at the top of the VM window. After a few seconds you'll be prompted to run the software in the VM (you'll also be asked to authorise the installation)

Let that run through, and then reboot the VM. Now would be a good time to take a snapshot (Machine->Take snapshot). This effectively creates a backup of the system state at the time it was taken, so if you test something and screw it up, it's fairly trivial to get the system back to how it was.

Now, create a shared folder between the host and the VM - this'll make it easier to move files between them. Right-click on the folder icon at the bottom right of the VM window, and select shared folders. Click the 'Add' button at the right hand side of the dialog that appears - fill in the path, name, and options for the share (Uncheck read-only, check auto mount and make permenant)

You'll now find you have a folder on the virtual machine under /media/sf_FOLDERNAME, where FOLDERNAME is the name you gave your shared folder (eg, mine was named Temp, so on the VM it's /media/sf_Temp). You'll also find you can't access it.
To fix this, in the terminal enter

sudo gpasswd -a USERNAME vboxsf


replacing USERNAME with your own username. You will need to reboot for the changes to take effect.

The final step is to allow the host to access the VM's server.
Go to Machine->Settings->Network, and click Port Forwarding on the network adapter you're using (1 by default)
Click Add, then enter the name (HTTP), host port (I chose 8080), and guest port (80). Click OK.
Now when browsing to localhost:8080 on your host machine, you should see the "It works" page of the web server on the VM.

Take another snapshot here.

This was meant to be a short intro to the main development, but seeing as it's already a lengthy post, I'm going to leave it here, and pick up the rest of the development later.