Thursday 28 December 2017

ID-card Lanyard Headphones

I, like a lot of people, work in an organisation that uses access control cards that we need to carry at all times - usually on a lanyard around our neck. I also like to listen to podcasts and music while I work, so that often means having a pair of earphones around my neck too. The combination of the two often results in tangling and general annoyance, so I thought I could combine them.

I revisited the cable tidy that I previously created (it was one of the first 3D printed objects I created, and definitely in need of some improvement).
I've since moved away from OpenSCAD in favour of Blender as my 3D skills have improved - The new design can be found on Thingiverse.

The plan is use a scaled down version of the cable tidy to control the part of the earphone wire from the connector to the split


and then have each earphone attached to the lanyard, coming out at the top with enough slack to reach my ears.

The cable tidy is straightforward enough, there are three pieces - the two halves of the inner section, and the outer ring. They all friction fit - once printed, just lightly sand necessary edges until a snug fit can be achieved.


A post shared by Anthony (@darkmidnight_diy) on

To create the lanyard I started with two promotional ones I'd received (they tend to be a common hand-out at conferences and trade shows). The main one also has a side-release buckle just up from the dog clip (the clip that holds the card... yes, I had to Google what it was actually called), which would also solve another annoyance - having to remove the lanyard while driving to get through the car park security gate.

The second, sacrificial, lanyard, is slightly narrower. This lanyard was cut into strips which would be stitched to the main lanyard to create a channel to contain the earphone wire.

I stitched up one side, put the earphone wire in place, then stitched down the other side to lock it in place. The length of wire was too long to begin with - this was partially by design - I didn't want to leave the top (earphone side) just open, as I could forsee wear and tear putting too much strain on the stitching. What I did instead was stich it 'too high', then cut down the middle of the sacrificial lanyard to pull the earphone through and create enough slack, and then stitch up behind it, so that there was more, stronger stitching supporting it.

I repeated this exercise for the other earphone, and it was done. One snag was that the earphones had a small button halfway down the wire for the right-hand earphone, which was a little too big. A dab of contact cement held this in place, and unless looking closely, it's not noticeable.

I tested using the lanyard at work before the Christmas break. As with all wearable tech, there's always the concern that it looks too goofy, so I picked a day where the office wasn't too busy, to see what, if any comments were made. All the feedback I heard was positive - for the most part it just looks like I have the headphones resting around my neck, and as for the cable tidy, a lot of others have keys and other items hanging from their lanyards, so it doesn't seem too out of place.


Saturday 2 December 2017

Dual booting Fedora 27 and Windows 10

I recently built a new desktop PC.
My previous machine has been in use for nearly a decade, so it seemed like time, and I've been wanting to experiment with watercooled systems.
I wasn't planning on making a post of it, but there were a couple of unexpected issues I ran into that I felt were worth documenting for future reference.

Dual Booting

I usually dual-boot Fedora Linux and Windows.

Unfortunately this time round, that was not as straightforward as usual.
After quite some time of searching, I found the answers, but it was a lot more hassle than it should've been, so I'm writing up my experience here in the hope that it may help others who are trying to achieve a similar setup.
The TL;DR of the problem is that it only ever seemed to be able to find the Windows boot loader, or the Fedora one (When I've done this in the past, it would find the GRUB loader, which would detect the windows one and add it as an option in the boot list, but this time it was not detecting the windows loader.)

There were quite a few failed attempts, so I'm not including an entire history, but this is the setup that worked.

Firstly, I used parted from a Fedora live disk to format the SSD into 2 partitions (a 50-50 split), one ntfs partition, one ext4.
Then I rebooted and installed Windows 10 to the ntfs partition. The installer actually complained about a lack of space, so to fix that I ended up removing the ntfs partion and letting Windows create it's own in the free space (it ended up using it's 50% of the drive to create multiple partitions.).
Another reboot to Fedora 27 live, and worked through the anaconda installer, specifying that it use it's ext4 half of the drive. Again, it wanted to use that space to repartition in it's own way, which is fine.
The bit that appears to really matter is to ensure that Fedora creates a /boot/efi partition in the same place that Windows creates it's /boot/efi partition (see screenshot)

The "Unknown" partitions at the bottom are the ones created by the Windows installation.
The /boot/efi partition is sdb4, as is the Fedora-created one (highlighted).


I was concerned about them being the same partition and whether or not Fedora would overwrite what was already there, so I created a backup image of that partition onto the other storage disk in that machine before proceeding with the installation.
Then began the install.

Once complete, I rebooted, and the GRUB menu appeared, with the Windows option available.

Networking Issues

The motherboard that I have chosen is the ASUS Strix Z270F.
It has onboard ethernet, which worked absolutely fine out of the box on Fedora, but on the clean Windows 10 install, the LAN controller was not detected.
Again, there's lots of forum posts with people suggesting various solutions, none of which seemed to work for me.

For some reason, installing the LAN driver direct from the ASUS-supplied driver disc didn't work - it failed because it couldn't detect the hardware.
Even opening up the disk, navigating to the LAN folder and running the Intel setup application from there didn't work.

The only way I found it would work is opening up "This PC", going to properties, then Device Manager, and finding the hardware there (it will be under "Other devices" and have a yellow "!" marker to show it's not working)
Right-click on it and select Update Driver Software.
Then "Browse my computer for driver software", and navigate to the driver disk's LAN folder.
Windows then detects and installs it and it works fine.

I can't begin to guess why installing it that way works and the other ways don't, especially as it's the same driver, but whatever. It's fixed.


Spec

MotherboardASUS Strix Z270F
ProcessorIntel i7 Kaby Lake 4.2Ghz
RAM32GB DDR4 3200MHz Corsair Vengence LPX
Disks500GB SSD, 4TB HDD
GPUGigabyte GTX 1050 Ti 4GB
CoolingCorsair H55
OSFedora 27 & Windows 10 Dual Boot

Friday 3 November 2017

Desk Stationery Organiser with pin and chalk board sides

This project was a spur-of-the-moment "Pinterest request".

Without any prior planning, I was given a picture from Pinterest and asked "Can you make me something like this?"

The pin in question was this desk organiser:


I found some thin plywood offcuts that were roughly 2/3s to 3/4s of the length of a new pencil, so figured that was about the correct height.

The length of the offcuts was slightly longer - approx 9 1/2 inches. It seemed a bit too much to split into 2 4-and-something inch pots, so rather than cut it down and create waste, I'd make my desk organiser three pots of roughly 3 inches each.

For the width, I figured it would look best if the pots were square, so I found some other offcuts and cut them to 3 inches.


The end result is a three-pot desk organiser with pots of that are 3x3 inches by somewhere between 4 and 5 inches tall.

For the base, I cut a length of pallet wood and cut grooves along the position of each of the middle dividers, and in turn cut a short section of each divider, so that the dividers would sit in the grooves:


On one end I cut a finger groove, as sticky notes are a standard 3x3 inch square, so one of the pots could be used as a dispenser for them.

I took apart a 'corkboard' (which turned out to be a thin veneer of cork over cardboard, and glued this around one side and the back.
On the front (the sticky-note side) I took part of the cork veneer and glued it on - purely for aesthetic reasons.

On the other side I attached a thin, flat piece of hardboard coated in chalkboard paint (which according to the tin was supposed to also be magnetic, but in reality isn't.)

I re-purposed some of the old corkboards frame to create a neat border around it all, and it was done.

A post shared by Anthony (@darkmidnight_diy) on

Sunday 15 October 2017

Reclaimed Wood Pirate/Treasure Chest

The first step was to join the slats together to create the boards that will form the sides of the chest.

As I don't have access to a planer/jointer this was a case of hand planing boards where necessary and being selective which boards matched together best.

In the absence of enough clamps I screwed the boards to a piece of scrap wood to hold them in place whilst the glue dried.
A post shared by Anthony (@darkmidnight_diy) on

With the boards joined, I could get a better idea of how the panels would fit together.

A post shared by Anthony (@darkmidnight_diy) on

The panels were too big to cut on my small tabletop saw, so I opted for handcut box joints.

I measured them so that the would line up with each of the slats on the long sides of the chest.

Cutting the curved top required some maths to match up the number of slats that would form the lid with the angle that would need to be cut in each slat to form a proper semi-circle.

A post shared by Anthony (@darkmidnight_diy) on

Once these were cut I glued them and used a metal bar bent to a curve to temporarily screw them to as it was not possible to use a clamp.

The handles are simple bought. The hinges were standard trangular shaped hinges, but in order for them to work with the curve of the lid, I bent them to a curve by heating them with a heat-gun and a hammer.

Finding a suitable padlock was more difficult - sure, DIY stores sell padlocks, but I wanted something more old-fashioned looking to fit the "pirate chest" aesthetic. After quite a bit of searching I found this one at a car boot sale.

A post shared by Anthony (@darkmidnight_diy) on


For finishing, I used the heat gun to heat the wood to the point where it started to brown (almost like toast), without burning. I thought about going the burn-and-sand method, but at this point I had invested enough time in the project that I didn't want to risk it.

Finally, the chest was finished with a coat of oil to help highlight the grain

A post shared by Anthony (@darkmidnight_diy) on

Sunday 1 October 2017

Can Crusher

At work we get through a lot of cans of soft drink, and an comment about incentivising recycling gave me the idea of making a can crusher.

So I doodled up this sketch, and decided to set myself the goal of building it without leaving the workshop.


With my initial sketch I was envisaging using PVC pipe as the container for the can, but it turned out that I didn't have any. What I did manage to use instead was this metal tube - it was scrap from an old side table.

Cutting apart the tube was substantially trickier than PVC would've been though. The ends were cut off with a hacksaw, and the middle 'window' section where the can would be loaded was done with a Dremel, a file, and a lot of patience.

The two plugs that would form each end were cut from a scrap of kitchen counter top, cut by bandsaw and trimmed to create a tight fit for the base end, and slightly looser for the plunger end.


Building the rest of the frame was a fairly straightforward process, the plunger became a metal rod scavenged from an old wardrobe rail, and the frame from lengths of 1cm x 1cm wood.

Initial testing showed the wood wasn't quite strong enough on it's own and started to crack, so I took the whole thing apart and reinforced all the joints with metal u-channel.


In the end, the design works, but it's a lot bulkier than I'd originally hoped, and would be best suited to perhaps being mounted next to a recycling bin, or maybe a can vending machine - as the test video below shows, it's a bit wobbly when just free-standing.


Monday 4 September 2017

LAN-party in a box, part 3

Part 3: The software side
Finally got round to tidying up the code. There's the arduino sketch which powers the lights, and a java application that runs in the background on the server, reads the server logs and will produce the serial commands that are sent to the arduino.

It uses the RXTX serial library, and the code itself is available on GitHub at https://github.com/darkmidnight/UnrealLANBox

There's still room for plenty of improvement, like getting the lights to flash when a flag has been taken.

I also put together a video showing the build process and a demo of it in action, see below

Tuesday 25 July 2017

LAN-party in a box part 2


Part 2 - A new case

When thinking of a new case for the LAN box, I wanted to ensure it was easy to setup, and as portable as possible. As portable typically means 'small', it was necessary to consider the heat that would be generated by the computer when it was in use.


I purchased this ammo box from the local army surplus years ago, and it's only been used for storage, but it fits the bill nicely, it's fairly small in relation to the flight case I'd used before, has a handle for portability, and being metal should help dissipate the servers heat during use.

On top of all that, being an ammo tin, it fits the military/industrial aesthetic of Unreal well, but I wanted to do something to set it apart.

While I was planning this project, we were joking during our weekly games that we needed some kind of trophy that each weeks winner could keep on their desk, so I was looking at options for that, and I was toying with the idea of creating the iconic Unreal logo in brass, to create a shield-type trophy.

Then I figured we could combine the two ideas.


To start with I printed the logo to fit the 20x20cm brass that I ordered, and stuck the logo to the sheet to use as a template.

My original intent was to cut the brass on the bandsaw, but after a bit of testing, it was incredibly slow, and I found it easier to start by drilling around the logo, and then use a Dremel to cut out the shape by joining the holes together. From there it was just a case of grinding and filing down the edges.

The same process was used to cut a hole in the side of the ammo box for the window to be mounted, though as the metal was quite a bit thicker, I used an angle grinder for grinding down the edges.

The brass was glued and sandwiched between two sheets of clear acrylic, and mounted into the hole.

A post shared by Anthony (@darkmidnight_diy) on

The original netbook that I used was too wide to fit the box, but I found another that just about fit - although I had to remove the screen, the battery, and pretty much anything else I could get away with ditching.

The next step was to add a band of WS2812 LEDs on the inside of the case, around the window, so that the logo could be backlit. To control them I used an Arduino Pro Micro, which I can in turn from the netbooks serial port. All the code will be covered in part 3.

A post shared by Anthony (@darkmidnight_diy) on

Update: Part 3 available here

Wednesday 28 June 2017

LAN-party in a box, part 1


Part 1 - The Story So Far
 
The title’s pretty much self-explanatory. My colleague, Ray, and I were talking about “The good old days” of online gaming – before Call of Duty, when the dominant games were Unreal Tournament, Quake 3, Counterstrike and the like.

We were toying with the idea of trying to run a LAN game over the work network, but figured the bureaucratic headache that would cause wasn’t worth it.

Then I got to thinking about how to cram everything we’d need for a LAN game into a single portable box, and could easily be set-up, used and torn down again within a lunch hour.

The great thing about returning to older games is that the system requirements, that once required hi-end PCs will now run on pretty much any old commodity hardware. What once meant lugging around heavy, bulky desktops, separate monitors and keyboards, could be replaced with a modern, lightweight laptop.

Ray was bringing in his laptop, and I setup an old laptop for me to use.

I installed Fedora 25 from a live CD (no particular reason for this distro, other than I had a live CD for it to hand – I’m sure others will work fine) Installed WINE, and the game.

We also wanted to use a dedicated server, so I dug through my stack of old hardware to find something to use - and I setup the server using an old netbook.

The networking was provided by an old home router of mine, which supplied DHCP configuration, making the network a straightforward plug and play.

This whole setup was stuffed into a metal flight-case for taking into work, and worked well for a spot of lunchtime multi-player, but there were a few downsides:

  • Cabling – lots of mains plugs and network cables.
  • Size - it's quite a substantial amount of gear to lug around - the flight case measures 33x46x15 cm and is packed pretty full.
  • Although UT runs quite well in WINE, there is definitely some latency. The server seems fine, but graphically on the client machine, it's noticeable
The original setup - the netbook in the background is the current server.

Obviously something needs to be done to address the shortcomings, so this will form the basis of my next project - it should be a nice mix of DIY (for the case) and tech (hardware, software config, networking etc).

Update: Part 2 is now here

Monday 5 June 2017

Wiresaw from Guitar String


A wire saw is piece of wire used for cutting. It's kind of like a band saw blade, except instead of having teeth, it cuts using abrasion - like a Dremel cutting disc does. It's a useful addition to the toolkit - it's one of those tools that might not see everyday use, but those times when you do need it, it more than pays for itself.

Most retail wire-saws tend to be aimed at the military / survivalist market, but I find mine most useful in trimming supports from 3D prints and cutting in hard to reach spots when dismantling electronics.

The great thing about wiresaws, is a lot of people will have one in their home, even without realising it. My wire saw is a string from a guitar.

The wound nickel creates the abrasive surface, being nickel it's quite resistant to the heat from the abrasion, and being a guitar string, is designed to withstand bending and flexing.

the downside to this, is they can be a pain to keep tidy. As they bend, they become more difficult to keep tidy.

So as a weekend project I made a simple case to store the wiresaw, helping to wind it neatly, yet keep it accessible.


As this was an off-the-cuff project, these measurements were not measurement by design, but what they ended up as after the fact, and are just there to give a rough indication of the sizes required.

I started with a 35mm length of dowel (10mm diameter). which i drilled two small holes through.


I grabbed a scrap piece of pine and cut a 20x35x55mm piece. I used a 20mm spade bit to drill partially into the 35mm side, and then used a 10mm drill to cut the rest of the way to the other side.


I used a router to carve out a groove from this hole to the short edge of the wood. There was a bit of tear out, but it doesn't affect it. The staple across the groove it there to act as a guide for the wire. I put the dowel in place, so that one of the drilled holes is on each side.


The guitar string is threaded through the carved channel, threaded through the dowel hole and tied. A piece of hardboard was cut to size, a 10mm hole drilled in line with the dowel and nailed to this side, effectively 'closing' the case. A small drill bit was pushed through the protruding dowel hole on the other side, and turned to wind the string in. A keyring was tied to the other end of the string, as a handle for the saw.


The drill bit was replaced with a loop of copper wire to provide a winding handle.

In an ideal world, this would have auto-retracted, like a tape measure, but some testing that I did showed that wasn't really practical.

Finally everything was trimmed to size and sanded down.


The finished project, closed (left) and open (above)

Friday 12 May 2017

In-Car GoPro headrest mount

I recently got a GoPro camera, primarily so that I can start using it to create more video content for this blog, but also from time-to-time I do driving track days, and would like to use the camera there as well.

On track days, a mechanical mount is required for any cameras mounted to the car (i.e., no suction cups to the windscreen). I wanted to capture some footage with my GoPro, so started searching around for in car mounts. The one I found mounted to the headrest, so that the camera sat at head level, between the driver and passenger seats. However, the price tag on it was ridiculous (£120+) for what is essentially a metal bar with a mount at the end. So I decided to make my own.

It centres around a length of square aluminium tube. I purchased a 500mm length online, expecting to need to cut it down a bit, but as it happens that length is ideal for my car, so I decided to leave it as-is.

The next step is to measure the position and diameter of the headrest poles. For this I just removed my passenger headrest and marked their position directly onto the tube.
The diameter calls for holes of 14mm.

Obviously, drills intended for metalwork would be preferable, but as aluminium is quite a soft metal, woodworking ones can be used in a pinch. I used a 14mm forstner drill to punch through the tube.


The bolt that will hold the 3D printed gripper in place, with holes drilled for a adjustable grip on the other side


To secure the bar to the headrest, I designed and 3D printed the parts shown below

Headrest clamp.
SCAD code listed below


The idea being that once printed, they're split into 2, and fit into the aluminium tube, where they're secured with a bolt and locking nut so that they clamp against the headrest poles. On one side the bolt will be able to be loosened and slid away, to loosen the grip, allowing the mount to be removed.
A small amount of Sugru was also applied to the inside of the plastic mounts, to provide a 'grippier' surface against the headrest, and hopefully avoid it being scratched.


GoPro Adapter.
SCAD code listed below.


I tried using some designs for GoPro mounts that I found on Thingiverse, so save me having to reinvent the wheel, however the ones I tried didn't work too well, and snapped. I decided to use one of the mounts which came with the camera, have it fit in a 3D printed frame (see right)


The initial idea was to have this fit flush in the tube, with cut outs for the mount, and holes for the bolt to thread through. However, I instead ended up oversizing the 3D printed frame, and it fit tightly into the end of the tube, so I decided to leave it as-is, although opted to keep the bolt, just to ensure the 3D printed and original GoPro mount are securely together (they're a snug fit anyway, and the bolt is probably redundant, but I'd rather have the extra layer of protection).


Test Video

 
SCAD code for the head rest clamp

difference() {
    cube([60,15,15]);
    translate([25,7.5,-1]) {cylinder(50,7,7,true);}
    translate([9,7.5,-1]) {cylinder(50,3.5,3.5,true);}
    translate([41,7.5,-1]) {cylinder(50,3.5,3.5,true);}
    translate([41,7.5,9.1]) {cylinder(r=6, h=6, $fn=6);}
    translate([9,7.5,9.1]) {cylinder(r=6, h=6, $fn=6);}
}


SCAD code for the GoPro adapter

difference() {
    lCube();
    cube([15,10,50], center=true);
    rotate([90,0,0]) {
        cylinder(50,3,3,$fn=50,center=true);
    }
}
difference() {
    cube([25,3,16],center=true);
    rotate([90,0,0]) {
        cylinder(50,3,3,$fn=50,center=true);
    }
}
module lCube() {
    cube([25,16,16], center=true);
    translate([20,0,0]) {
        cube([25,16,16], center=true);
    }
    
}


Wednesday 3 May 2017

Old Hand Saw Restoration

I found these old saws in my local scrap store for a quid. I've always been a fan of the old-fashioned aesthetic of wooden handles. So being just a quid, I thought I'd grab them, although I wasn't really sure what I wanted to do with them.

Before

A post shared by Anthony (@darkmidnight_diy) on

The Blades
The blades were very rusty, and I wasn't sure if they'd be salvageable. I was only really after the wooden handles anyway, but thought it'd be worth a shot restoring them.

One of the "old-wives tale"-type solutions for rust is white vinegar. I was sceptical, but it's a cheap option, so I gave it a shot, and it worked surprisingly well.

It takes some time, but takes little actual working time - I just set up the blades soaked in the vinegar (I found it easier to wrap the blades in kitchen roll/tissue paper and soaking that, rather than trying to find a suitably sized container).

I did that first thing in the morning, left them most of the day and later rinsed them off and scrubbed the blades. It got the worst off, but there was still a few spots of rust that remained. For that I used a wire brush.

The screws were brass, and cleaned up easily with Brasso.

The Handles
The handle of the tenon saw was in the worst state of the two - removing the blade revealed quite a large crack running from the near screw hole to the hand opening. During disassembly this caused a fragment to break away, but I was able to glue it back neatly with Superglue and it's not noticeable unless it's being looked for.

The flat sides of the handle I sanded with an orbital sander, but sanding the curved areas required a Dremel and a lot of patience.

Once sanded both handles were stained with a redwood stain, applied using a cloth rather than a brush (I find this highlights the natural woodgrain better).

After

A post shared by Anthony (@darkmidnight_diy) on

Now they're restored, I'm still not entirely sure what to do with them. I have plenty of other saws, so it's not like I'll particularly need them for actual work, so I'll likely just use them for some artsy display or something in the workshop.

Side note: After removing all the rust, I discovered this faint engraving on the side of the tenon saw. It says PT2250, and appears hand-engraved.
It's very faint and difficult to photograph clearly, but it's hand written and says "PT 2250". Wonder what it means?

Monday 17 April 2017

App Update: Bluetooth Macro and Voice Input v2.0


The Macro Input System app has undergone a significant overhaul.

Macros are now stored in an internal database, and can have categories assigned.

Download

To create a macro
Select the menu, then Create Macro. Give the macro a name, short description, category and the actual macro content (in the same format as previous versions of the app), hit create.

If you have multiple macros in the same category, they will be nested in the macro list. Useful for keeping similarly themed snippets together – terminal commands, code snippets, etc.


To send a macro
Tap on the macro in the list. Alternatively, long press on the macro in the list, and from the pop-up, select Send. If you want to preview the text that will be sent before sending, tick the Preview checkbox. If you select this, then when you tap on the macro, a pop-up will appear displaying the text and ask for confirmation before sending.

To edit a macro
Long press on the macro in the list, and from the popup, select Edit, where you’ll be taken to the same screen as in the screenshot above and be able to edit the description, category and content.

To delete a macro
Long press on the macro in the list, and from the popup, select Delete.

To import macros from previous versions
There’s two way you can do this:

1) From the menu, select Create Macro, then from the options menu again, select Load from File. You’ll be presented with a file list as you would have in previous versions of the app. Navigate to the macro you want to import. The Create Macro dialog will populate with the name and content of the macro. From here you can edit the category and description, and save it to the database.

2) From the menu, select Quick Import. You’ll be presented with a file list as you would have in previous versions of the app. Navigate to the macro you want to import. The macro will be immediately imported, with the file name as it’s title, and “Quick Import” as it’s category. You can edit this later if need be.

Note that once imported, editing the macro will need to be done via the edit function outlined above. Changing the file on your phone will not update the macro.

 
Using Speech Recognition
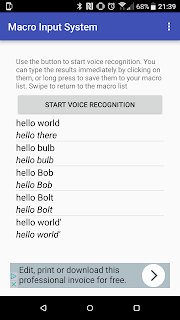
Either hit the speech recognition button or swipe to access the Speech Recognition screen. On that screen, hit Start Voice Recognition to begin. When the prompt appears, start speaking. When you’re done, stop speaking, and the results will be processed, and a list will appear of options that the system thought it heard, starting with the highest probability.

If the recognised speech matches the name of one of your saved macros, it will be added to this list.
As with the other macros, tap to send the text.

You can also save speech recognition macros for later use – just longpress on the macro and select Save from the menu. They will be saved under the category “From Speech Recognition”


Support
As with all my apps, it is free, and as such, I am not in a position to offer any kind of official support, so use entirely at your own risk.
If you have any trouble with it, then feel free leave a comment or tweet and I'll try to help as and when I can, but I make no guarantees.

Tuesday 28 March 2017

New Web App: Target Creator


Quick Link

The application can be found at http://targetcreator.darkmidnight.co.uk
http://targetcreator.darkmidnight.co.uk


About
 
Years ago I used to have an air rifle and spent a lot of time target shooting. When I wasn't competing, I'd enjoy coming up with different target arrangements and challenges to add variety – some favourites included things like popping balloons, trying to snap a thread to drop a weight (cowboy-movie hangman style), and trying to shoot through the centre spindle hole of a CD without touching the disc itself (Remember those AOL promotional CDs they’d put through the door? Guess where mine went..)

This was about the same time that I was learning to program, so naturally the two hobbies intersected, and one of the first applications I wrote was a target creator that not only allowed me to print paper targets from home, but also customise them by changing the diameter of the rings/bullseye, change colours, put multiple smaller targets on a single page, etc.

The application was a Java desktop application – nothing particularly ground breaking, but for an early project, I was proud of it.

Fast-forward to a few weeks ago, and I was sorting through a bunch of old stuff in storage, and happened to find a printout of a couple of pages of the programs source code (I don’t remember why I printed it, but apparently I did). Hit with a wave of nostalgia, I thought I’d rebuild a modern version of it.

In the years since I made the original, many desktop applications have given way to the rise of web-apps, so I decided to take it in the same direction. The core of the new version is rebuilt from the original, but as a web-app, it doesn’t have direct access to printers, so now it produces a PDF instead. I also added in a QR code function so that you can in effect ‘save’ chosen settings for a target to return to it to print more later, and the ability to switch between A4 and US Letter sized paper.

The application can be found at http://targetcreator.darkmidnight.co.uk

Usage
  • Select your chosen unit of measurement – imperial (inches) or metric (centimetres)
  • Select your paper size - A4 or US Letter
  • Set the first rings diameter, and select it’s colour.
  • Either select “Use the same thickness for all rings” or repeat the above for rings 2-9, also selecting their colours.
  • Do the same for the bullseye.
  • Chose your additional options – either a single target centered on the page, or fit as many as possible onto the page.
  • Choose if you want a QR code appended to the corner of the PDF to easily recall your chosen settings.
  • Then click Generate to produce the PDF, which you can then print.

Sunday 12 March 2017

Farcry-inspired Leather Notebook part 2

In my last post, I started making a leather notebook inspired by Farcry. For the first part of this build, click here.


Paper
I opted to use a mix of papers in the notebook, so it could be useful in multiple situations - I included lined, plain, squared, and sketch (plain, thicker stock paper).


Pen Loop
I wanted to get some practice using hardware with the leather, so I used a scrap of leather of approx 1 inch width, wrapped it around a pen for size, and trimmed it to create a pen loop, which I fixed to the left of the notebooks cover flap, so it would sit in the fold opposite the spine, which will help balance out the overall thickness of the notebook (to help achieve the stated aim of keeping it pocket-size).

The Cover

I shaped the cover with a curve, and added an eyelet hole. This is to thread a leather lace to act as a closure for the book.

The lace itself, was literally a leather shoe lace - I had to cut it short, and slice it lengthways to fit the eyelet.


The Farcry journal had a small metal charm-type item on the end of the lace, which serves as kind of latch mechanism, as well as having it's aesthetic appeal.

I didn't have anything particularly symbolic or meaningful, but I did have a small hollow metal die that came from a Christmas cracker, and a metal hook. I filled the hollow die with contact cement and screwed in the hook, giving it time to set, then tied that into the other end of the lace.


The finished notebook

A post shared by Anthony (@darkmidnight_diy) on

Despite the caption, I think this project will be one I never really consider 'finished'. There are plenty of things I would change if I re-did the project, but given that this is my first attempt at making something with leather, I'm very pleased with how it's turned out. I'll definitely be keeping leather work in my repertoire.


I envision that as a project book, it will be modified and tinkered with as I learn new things and will be a bit of a 'test bed' - two things that immediately spring to mind is the finishing of the materials' edges, and embossing a logo or emblem into the cover.


Sunday 5 March 2017

Farcry-inspired Leather Notebook

This year I resolved to pick up a new skill.

A key game mechanic in Farcry 4 is the survival and "living-off-the-land" aspect of the fictional island of Kyrat. Part of this aspect is hunting, and using the pelts to craft useful items, such as backpacks, holsters etc.


That, coupled with seeing some leatherwork done by Jimmy DiResta in his videos, inspired me to have a go and teach myself some leathercraft.

For a first project, I decided to make a leather notebook, based of this faux-leather journal that came with the collectors edition of Farcry 4 (left).

I'm the kind of person whose idea of a notebook is usually a sheet of printer paper folded into four. I usually start using a notebook, only to find various flaws that stop it fitting into my workflow - like being too large to fit in a pocket, getting left behind, nowhere to add additional sheets, etc. So this seems like a good chance to make something exactly how I want it.


Spec

Essential:
  • Refillable using cheap paper (ie, printer paper folded into four)
  • Fit in the back pocket of a pair of jeans.
Other nice-to-haves:
  • Mix of paper - it'd be handy to have lined, plain, squared/graph paper in one notebook.
  • Space for printouts/other paper - some kind of pocket.
  • Pen loop
Process
The size was based around a sheet of A4 paper folded into quarters, with approximately 1 inch added for the spine.


Another layer of leather was added in the spine to strengthen it, and fixed with contact cement.
Four loops of thread, stretching from top to bottom of the spine were added, approx a quarter inch apart. This will be where the paper is mounted - either I can use it for four different types of paper, or treat it as four sections for different projects.


A second outer layer of leather was added to the back, the same height as the main section, but wider (total width approx 300mm. This excess piece would create the wrap-around cover for the book.)


I misjudged the behaviour of the main front and back cover - I thought that the double layer of leather would behave as though they were a single, thicker layer. However, I found when folding them, the inner layer would bulge out slightly, so I was concerned about using contact cement to join them.

Although this did create an opportunity - stitching each side and the base of each cover meant that I could leave the tops open and create pockets for printouts and other papers.


This finished off the main structure of the notebook, with the next steps being to refine it and add finishing details (and of course, paper), which I will cover in a later post (Update - Part 2 is here)


Sunday 12 February 2017

App Update: Soundboard 1.8.0

A new update to the Soundboard application on Google Play has been released.

What's New
A new Tone Generation feature, which allows the user to generate sine-wave tones and play them back.
Also a bug fix - on the DTMF screen, swiping between the screens would effectively have the effect if the DTMF buttons being stuck in a pressed state, causing a continuous playing of the tone. The layout of that screen has been amended to reduce the occurrence of this happening.

Usage
From the app's start screen, use the Tone Generator button, or swipe across to access the tone generation module. On that screen, use the slider or text box to select your chosen frequency, set the duration, and hit generate to play the tone The module is also subject to the volume controls of the rest of the application - go to preferences in the menu and you'll be able to choose whether or not to dynamically set the volume level on playback, and set the volume level if you so wish.

Support
As with all my apps, it is free, and as such, I am not in a position to offer any kind of official support, so use entirely at your own risk.
If you have any trouble with it, then feel free leave a comment or tweet and I'll try to help as and when I can, but I make no guarantees.

Download

Saturday 28 January 2017

Reclaimed Wood Kitchen Tidy


I live in a small flat, and in the kitchen there's not a lot of storage. As a result, the bins (general waste & recycling) have always just lived in the corner of the room. It's not a major issue, but bins aren't exactly nice to look at, made worse given that it's an open plan kitchen shared with the lounge area.

I found a couple of solid wood bedframes that were otherwise destined for the landfill, and took them apart, and used the timber to build this kitchen tidy unit. There's not really any new or ground-breaking techniques to document, so the rest of this is predominantly a photo post.

I'm pleased with the result, and I plan to do more reclaimed wood projects in the future - as all the timber was reclaimed, the only material cost ended up being the wood dye and varnish, which makes woodworking much more affordable.


A photo posted by Anthony (@darkmidnight_diy) on