Showing posts with label repair cafe. Show all posts

Sunday, 10 November 2024

Krups “Espresso Piano” XP521040 coffee machine repair

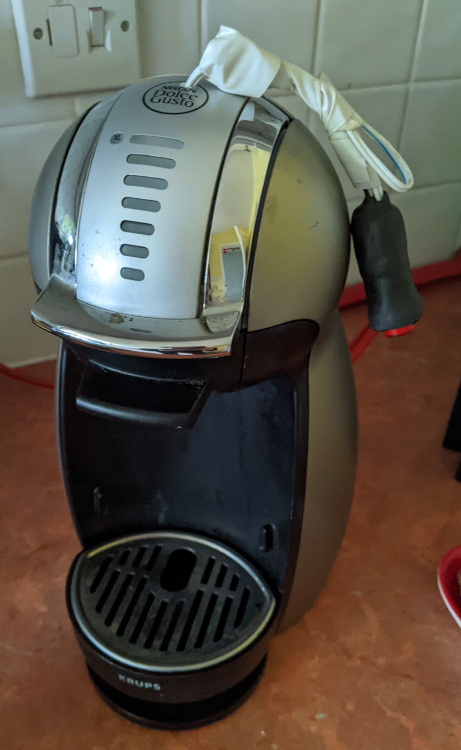
Since repairing the Dolce Gusto pod coffee machine a few years ago, I upgraded to a proper espresso machine, The Krups “Espresso Piano” XP521040.

It was another freebie hand-me-down from a relative who no longer wanted it, so I have no particular opinion on whether it’s a great machine compared to the competition or anything like that – it’s merely a step up from using a pod machine (with or without re-usable pods).

The problem
A while back it started acting a bit weird – especially if I was making more than one coffee – it would seemingly enter what I thought was a cleaning cycle.
It just keep pumping water out into the drip tray until I switched it off at the mains.

More recently it failed more completely. As soon as the machine was switched on at the wall (even if the machine had not been switched on by it’s own power button), it would start pumping water into the drip tray – the only way that the pump could be switched off was at the wall socket.

Diagnosis
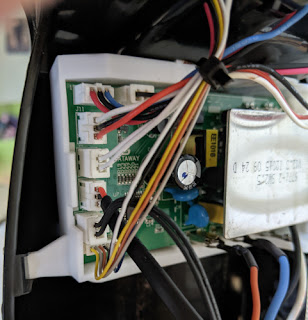
Starting by opening the machine up from the bottom, I quickly found the controller board. 

For a consumer product, the circuit board is surprisingly well labelled.
There are a number of braided wires, connected with spade type connectors.

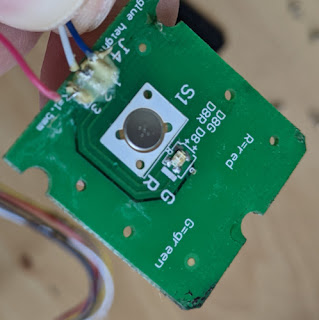
After a bit of probing around, I noticed that the PCB had a slight scorch mark at the base of one component. It was very small, I actually didn’t notice anything during the initial investigation - it was only when I’d just about given up and was packing away everything to dispose of that I spotted it.

The scorch mark around the leg of the failed component


The component in question is a BT134. This is a triac, and it is connected to the pad with the spade connector labelled “pump” – So it seemed a likely culprit.

Tracing the connections about the machine appears that the pump has a direct AC connection, so my guess as to what happened is that the component failed and it’s failure state effectively held it open instead of in a “switched off” state.

This does explain why the pump was active only with mains power, regardless of the rest of the machines state.

The fix
The fix itself was plenty straight forward. I sourced a replacement BT134, I swapped it out, which requires no more than a little bit of soldering.

Putting it all back together, I tested it and it works fine.

There’s nothing more to it really than that, I just want to write up and publish this in case it helps anyone else who may be having similar issues with our machine. But as always, these posts should be treated as a diary of what I did, and are in no way a how-to or guide. I am by no expert, what you do with information I provide is at your own risk.


Friday, 17 December 2021

Dolce Gusto Genio2 Coffee machine repair

Last year, I was given a Dolce Gusto Genio2 coffee machine for repair.
The owner reported bad water flow, and said that they had attempted to clear limescale, etc using citric acid with no luck, and suspected that the pump was dying.

A quick search showed that there’s an unclogging pin tucked away between the water tank and the machine body. Using that I simply unclogged the nozzle and it worked fine. There’s a good lesson there about trying the simple things before jumping to more complicated conclusions.

Once fixed the owner gave it to me, as they’d already got a new one.

"Before"


Given the wasteful nature of the pod-based machines, and the reputation of the company behind them I took great pleasure in my free coffee machine which I then got some reusable pods for - so despite using one of their machines, I have managed to avoid becoming part of their ecosystem.


The main PCB - the bottom connector leads to...

Recently though the machine broke again a couple of times when turning on the lights would blink several times and then go out - shortly after it would just not turn on at all.

I pulled the machine part. iFixit have a good guide to getting the machine apart, so I won’t rehash that here.

After some testing with the multimeter I narrowed the problem down to to the PCB with the power button and the light on.


... the LED fill level board,
which in turn links to the power button board.


It appears that of the three pins, pin 3 is the power, with pins 1 and two being the return line for the red and green LED respectively.

When picking around with the multimeter some more I accidentally shorted pins 1 and 3 and the machine started up, so it seems that the button shares wires with the lights.

With this information in hand further testing indicated that it was the button itself that was faulty.

Unfortunately, there is not an awful lot of space in case for a replacement button - only approximately 2mm. I did not have a button that would fit, but seeing as I cared more about getting coffee then the aesthetics of the machine, I did the next best thing and drilled the hole through the case running wires to the relevant pins.

Then I attached an external button. One that has an integrated LED back light. It is any a single colour though, so I wired it in place of the green LED, so that the button being lit is indicative of the machines ready state.

Then I put the machine back together, and tested to confirm it works.
It's not the most stylish of alterations, but I had no intention of getting another machine, so it was either this or start getting used to instant coffee again.

After


Thursday, 19 December 2019

Repair Cafe Update - November & December

A couple of months have passed quickly by and the November and December repair cafes have been and gone.

November

To start with there was a jammed paper shredder. Having taken it apart we found that the jam had caused the motor to flatten the teeth of one of the gears. Given the lack of available replacement parts, it seems like it's not going to be repairable.


The next item was an oscillating sander that wouldn't turn on. An initial suspicion of the motor brushes being worn was scuppered when the screw terminal on the PCB that connected the main cable, fell away during disassembly. It looked like the pins had just corroded through. There was enough left of the pins that it was possible to scrape the corrosion away and re-solder the connector.


Third up was a lamp. The issue became obvious when unpacking it, as one of the pins fell of the mains plug. The power adapter was disassembled, but turned out not to be salvageable. However a replacement shouldn't be too hard to find.


Finally a Technics Hi-Fi received was brought in with reports of the radio not working, and volume dropping intermittently. There was no obvious way to replicate the problem, but it did seem that the radio might have been badly tuned, and some cycling of the volume control seemed to sort the volume issues. Given that nothing was particularly done, yet the problem seemed to go away, it's hard to class it as a win or a loss.

Scorecard

This monthTotal
Wins12
Draws
(Workarounds and partial fixes)
13
Loss11
Needs parts13


December 

I managed to find a replacement power adapter for the lamp that was brought in last month, so was able to turn that into a quick win.

Second up was a dumpster-dived angle grinder that was just not powering on.
After checking the usual electrical culprits it was a case of the plastic switch being decoupled from the actual electrical switch - all it required required being clipped back into place. Unfortunately the nut that holds the disc in place was gone, but I'm sure a spare can be found in time for next time.

Unsurprisingly, there was a set of Christmas lights. Unfortunately not salvageable as it looked like there'd been an attempt to glue the bulbs in place.

Finally, a family brought in three lamps - I took two of them, one of the volunteers took the other. The first of mine was just a fuse replacement - easy win.
The second was also a fuse replacement, but it wasn't the plug fuse, it was a smaller device fuse on the circuit board of the lamp. With no replacement available, all we could do was advise them of the fuse that was needed and I showed them how to replace it.

Scorecard

This monthTotal
Wins24
Draws
(Workarounds and partial fixes)
03
Loss12
Needs parts23

That was the end of the repair cafe for the year, and although I've only been part of the repair cafe for the past three months, I was pleased to hear that a total of 650 kilograms of electronics was repaired in 2019, and I'm looking forward to trying to beat that record next year.

Wednesday, 9 October 2019

Repair Cafe

I recently started volunteering at a local 'repair cafe'. It’s a community environmental initiative where people in the local community can bring in small broken consumer electronics, and the volunteers will see if it can be repaired, at no charge, in order to keep items out of the waste stream.

If items can’t be fixed on site, advice is given whether it’s worth repairing, and if so what parts, etc. might be required. If they can be fixed, they’re tested to ensure they’re safe, and weighed so that the organisation can monitor the amount of material kept from landfill.

The other volunteers have a wealth of experience in a number of technical and scientific fields, so I also see it as an opportunity to learn and improve my skill set.

I’m also going to keep a record of the repairs I do, and document them here in the hope that it provides a DIY reference for others who may need similar fixes but aren’t able to access a repair cafe in their area.

So, these are the repairs I was faced with on my first day:
  • An automatic cat feeder – a simple mechanical clock device turning cogs which in turn allowed a lid on a good tray to open after the set time. The mechanism was reported as being slow. Observation of the device over a couple of minutes didn’t really show any sign of being off, and a test over half hour showed some drift – about an extra minute. The device was far from being a precision instrument though, so suggested that they observe the amount of drift over the time period they’re after and adjust the time they set accordingly.
  • An electrical beard trimmer. The mains wire was disconnected. Soldered in place and fixed.
  • A DAB digital radio, on which the LCD display wasn’t functioning. Managed to disassemble and retrieve the faulty part, so that a replacement could be found.
  • A toaster. The lever to push the toast down was stiff. This seemed to be a design flaw in the toaster, where the lever being pushed down would effectively pivot on the rail where it’s mounted, causing it to bind.

    There wasn’t much that could be done to repair it, but was able to advise the user how to workaround it by keeping the lever flat whilst it was being pushed.


  • A halogen cooking lamp thing. The timer and the fan would run, but the halogen lamp wouldn’t turn on. Testing showed no power to the halogen connector.
    Tracing the problem back showed that a potentiometer device (pictured) which set the halogens temperature had broken part.

    Advised the user of the broken part so they can try and get a spare from the manufacturer to attempt a repair next time.


    Scorecard
    Score
    Wins1
    Draws
    (Workarounds and partial fixes)
    2
    Needs parts2