Monday 27 October 2014

Remastering Tiny Core Linux

Tiny Core Linux is a lightweight Linux distribution designed for Live CD usage. Its low system requirements and small footprint also make it a good candidate for reviving older computers or as a base for building virtual machine appliances.

Unfortunately the remaster tool it includes, which is meant to allow for custom Live CDs to be created with chosen software pre-installed, seems to be buggy, and continually failed when I tried using it, so this is the alternative way I found to remaster TCL.

Step 1
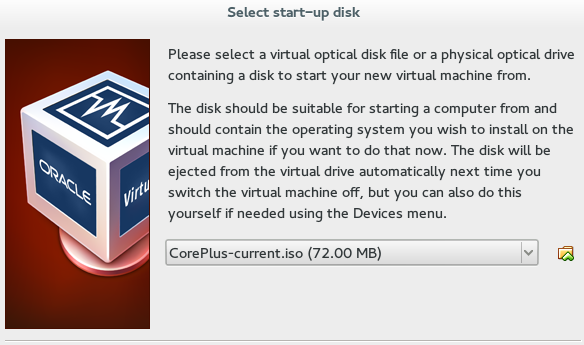
Create a basic virtual machine and boot with the TCL Live CD. I used the CorePlus-current.iso, which has some extra software on there, but is still sub 100MB.


Once it's booted to the desktop select TC Install.


Select USB-HDD, whole disk and 'sda' options on the first screen.

Click through the next two screens (formatting options and boot options)


On the install type I checked the Installer Application option as I might need it in my intended application later, but it's optional.

Click through to the next screen where you're selected options will be repeated back to you, and select Proceed.

When it's done installing, shutdown the VM, remove the Live CD image and restart, so that it boots from the HD.


Step 2
Go to apps, and install the software that you require. In my case I installed Open JDK and Filezilla. (Filezilla also requires libiconv to be installed)


Reboot using the TC Exit options (from the menu go to Logout). The backup options there will essentially create a blank mydata.tgz file structure for you to use later.

Once rebooted, copy the /mnt/sda/tce1 folder off the VM to the host system/memory stick whatever (As I installed filezilla I FTP'd it to another server on my network.)

Step 3 (Optional)
On the host system, edit the mydata.tgz that you copied over, and add in any necessary files that you want on the Live CD. Thanks to the reboot that you did in step 2, mydata.tgz will have a basic file structure in place, that maps to the home and opt directories of the live CD. Also it puts in a couple of SH scripts, bootlocal.sh and shutdown.sh - these handle things that you want to execute on boot and shutdown respectively, edit those if you need to.

Step 4
Use an ISO editor (I used ISO Master).
Open the LiveCD, and navigate to it's 'cde' directory
Copy your mydata.tgz to the ISO, and replace its onboot.lst, and 'optional' directory with your own.

Navigate back to the ISOs /boot/isolinux directory and edit the isolinux.cfg file.
Find the line

TIMEOUT 600

This line causes it to sit on the bootloader screen for 60 seconds, unless the user selects and option.
I want my live CD to boot without user interaction, and that delay is redundant, so I edited it to

TIMEOUT 10

which allows a 1 second delay before continuing to boot the default option.


Save the edited ISO. To test, setup a blank VM like you did in step 1, and select the edited ISO as the boot medium. TCL should load, with your apps and files already there.

Sunday 19 October 2014

HD44780 LCD to Raspberry Pi

My interest in electronics initially started as a result of PC modding back in the late 90s/early 2000s. Back then, most desktop computers were typical beige boxes - it was all about the internal hardware, not the design of the system itself, and it fell to the users to make then any more interesting than that.

A common mod was to install a LCD screen into the front of the desktop to display things such as system stats (CPU, Memory, temperature), notifications (Email/MSN/ICQ!) or the currently playing track on Winamp.

My old desktop PC has long since been retired, but I still have the LCD that I used, and now I've found an excuse to use it again.

Nostalgia aside, I have a project underway that is going to require a headless Raspberry Pi. While it's easy enough to SSH into the Pi and get to a terminal from another computer, it would also be handy to have at-a-glance stats available.

Fortunately, there's a way to connect a HD44780 LCD (standard text one like mine) to the Pi, using the standard GPIO pins, and leaving the serial pins free (which I'll need for another part of the project).

The thing to be wary of when looking for instructions on connecting one of these displays to a Raspberry Pi is that there are many 'LCD backpacks' and specially designed accessories out there. I'm not using any of those, simply the Pi, the LCD, and a potentiometer to adjust contrast on the display.

Adafruits wiring guide is a good start. While it's aimed at 16x2 displays, it does apply to those of other sizes (the one I'm using is 4x20. They keep referencing their 'Pi Cobbler', though this is simply a breakout board they sell, and it's easy enough to map to the standard Pi pins.
 
A couple of points worth reiterating - the GPIO pins are designed for 3.3v operation, but the LCD for 5v. To avoid 5v being sent to the GPIO, connect the RW pin of the LCD to ground. Also worth noting is the difference between LED and EL backlight. EL has a higher current draw, so trying to power it from the Pi might overload it (LED however is fine). The displays can operate just fine without the backlight, so it's optional anyway. Mine is EL, but I don't really need it, so just left it unconnected.

I was relieved to see that LCDproc is still around. This was the software I used back with my old desktop, so I chose to stick with this instead of the Python solution Adafruit suggest. The pins that they recommend using are slightly different, but can be adjusted in the LCDproc config.

  • To install LCDproc on the Pi, run
    • sudo apt-get install lcdproc
  • Open the config file
    • sudo nano /etc/LCDd.conf 
  • find the line
    • Driver=curses
  • and replace with
    • Driver=hd44780 
  • Find (Ctrl+W) the [hd44780] section and change the ConnectionType line to
    • ConnectionType=rpi 
  • Underneath add the pin mappings in the format shown below 
D7=18
D6=23
D5=24
D4=25
EN=8
RS=7 
 
Even though there is a driver file (hd44780.so) in the driver path, it doesn't seem to work.
Some Google searching found someone else with a similar issue and a replacement driver file, see steps 4 through 10 on there. (though note there's some differences in the rest of their setup to mine, so beware.)

Once that's done, restart LCDd with
  • sudo service LCDd restart
and you should see some text on your LCD!

The default LCDProc screen - the ribbon cable at top left connects to the Pi GPIO.
The small PCB in the top right is a 3.3v to 5v level converter that is to be used for a different project.