Showing posts with label garden. Show all posts

Tuesday, 30 May 2023

Wheeled flower pot stand

When I started woodworking, a key motivator was simply financial - make stuff myself and save cash.

A recent trip to the garden centre, where they were selling these wheeled flower pot stands at absurd prices, convinced me to get back to basics and make my own.

There's nothing complex about this build. Simple pallet wood - all from the same pallet to keep consistent appearance, and avoid the need to process the wood too much (planing, thicknessing etc)

A simple grid of five slats with gaps in between and two perpendicular underneath, all 40cm in length. Each overlap with two screws - the only 'gotcha' being to be mindful of the screw placement on the end ones, given that it'll be cut into a circle.


Then simply cut into a circle with a jigsaw, and a quick sand to remove sharp edges.

Four wheels from an old office chair were attached - these are simply push-fit into a drilled hole.

That's all it took - literal junk (pallet wood, wheels scavenged from a binned chair, and even the screws were from the 'miscellaneous' jar). Whole thing took less than a couple hours and saved about thirty quid.


Tuesday, 9 August 2022

Multi-tiered triangular planter

I'm pretty sure at some point I said I was done with making planters, but, here we are, here's another.

It's a multi-tiered, 4-segment planter made from pallet wood and arris rails from a dismantled fence.

I've always liked the idea of mixing differing heights in gardens, like with the firepit project, and as we're aiming for a zero(ish) waste approach to the garden, planters are a great means of re-homing soil that is displaced from other projects.

The triangular arris rail is an example of letting the available materials influence the design of the project. In my original sketches I'd planned for a square design, but finding the arris rail led me to using triangles, which actually fits better as the planter is intended to go in a corner.

Likewise, the pallet wood influenced the sizing, as the sizes of the triangle are 120cm, which is a standard footprint for a pallet.

Sunday, 27 February 2022

Flip-top bench for garden storage

Building on from the last fire-pit/patio project, the reason that I was not too worried about the mismatched slabs at the back of the firepit patio was because I knew that the aim was to put some bench seating there which would cover them over.

The slabs at the back were a mix of different styles and sizes to just provide a solid base and gap-fill


This project is to build that bench seating.

It will also serve as the new "shed", with a flip top lid where garden tools and such can be stored without needing an actual shed.

The width of the patio between the planters at each end is approximately 12 ft.


While it would have been possible to to get single lengths of timber that would cover the full distance, obviously this would look rather basic. 


Instead we settled on 8ft lengths which would allow us to create a staggered joint similar to that of brickwork, making a much more aesthetically pleasing finish.

We also opted for 2" thick lengths to prevent warping, and add weight and sturdiness.


The height and depth of the bench are based upon the measurements of existing regular garden benches that we already had, so we can be confident that they provide a good seat height. (~16-18 inches).

This is why the there is a mix of 4" and 6" wide.

The open lid and gas strut
(before burning)

The remaining lengths of timber were used to create supports on the inside of the bench, where each of the lengths were joined.


The lid/seat was mounted with 3 shed hinges. Obviously a lid of this size is quite heavy, so to aid lifting it, two boot-lid gas struts from a scrap car were mounted, one at each end.


The closed bench, showing the latch
(after burning)

A latch and padlock was also added, recessed into the front (so that it didn't catch peoples legs when sat down.)


Finally there was a colour difference between the 4" and 6" wood - the 4 being much lighter, so it was burned with a blowtorch so that it would fit in better.


Thursday, 26 August 2021

Woodstore / Planter from reclaimed wood (old shed)

After finishing the upcycled planter by the firepit, I realised that something similar would be useful as a wood store for the firepit, and would also help define a boundary to the patio and fire pit area.

Looking through the remaining timber from the shed, there was still the shed floor, and the second long wall to use, and the short (back) wall

These formed the back and front of the second planter, with the back wall being split into 2 lengths to provide the sides, in mostly matching dimensions to the first planter.

To help keep the wood dry, the shed door and it's hinges were repurposed. The thing is, the planter is around 8 foot long, and the door only 6.

To overcome this, it's split into 2 sections, with a divider made from part of the shed front. The 6 foot section with the lid is the woodstore, and the remaining 2 foot section was lined out with plastic to create another planter, in the same manner as the first planter.

The idea is that this will house climbing plants to grow along the trellis that has been installed on the fence at the back of the patio.

The door had to be trimmed down as the planter was narrower, and the hinges had to be switched to the opposite side. A bit of scrap chain (left over from the light fitting project), and an odd carabiner clip I had lying around, were looped around the tree to provide a latch to hold the lid open when needed.


Bonus Planter

That was meant for making planters. But, when I set out with all these garden builds, I did set a 'zero-ish' waste rule. And when the bricks were delivered, they came in a wooden crate, which would then need disposing of.

Plus there were a few miscellaneous bits of shed panel left, which were otherwise just going to be firewood.

So I quickly whipped up a third mini-planter to go out on the front lawn. It's pretty rough and ready, but will serve it's purpose, at least for now and until I have more definite plans of the work I want to do out front.


The bonus planter, just needs top soil and plants

Sunday, 15 August 2021

Planter from old shed

When working on the patio and fire pit, I took on the challenge of 'zero-ish' waste - not having any more waste than could fit in the regular household bins. No skips, special collections etc.

On the opposite side to where the fire pit was built, there was an old shed, which wasn't in bad condition, but was unwanted.

It was taken down so that we could make use of the paving slabs which were being used as it's base.


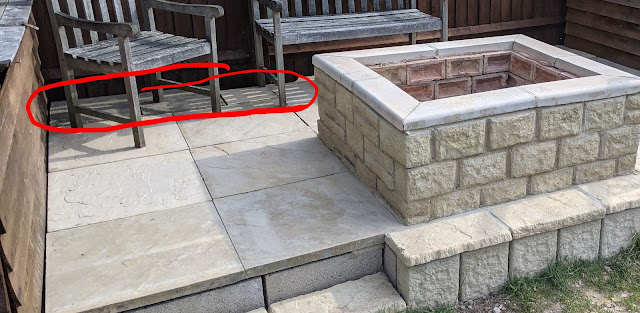
Along the side of where the raised patio was being built, there was a gap which used to have long-dead roses in - the area marked in brown in the patio-plan model below


Just eye-balling it, I could see that the length of the shed (approx 8 feet), was about the same, and came up with the idea of using the sides to create a raised planter there. 

It also helped the zero-ish waste plan, as the planter would provide space for re-homing soil removed during the fire pit and patio builds, as it could be filled up from ground-level

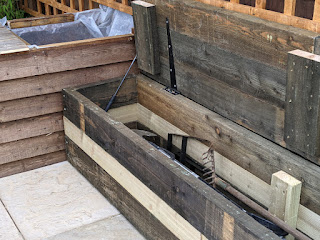
The frame was simple, just the four sides simply screwed together - leaving the bottom open for drainage.

The front panel was cut down from the front of the shed (below the windows), and the back of the planter was one of the roof panels of the shed. The sides were the other roof panel, cut lengthways.


The back of the planter is higher than the front - I considered cutting it down, but it does provide some utility in that it gives a place to mount things like chicken wire/frost protection/cold frames over the top of the plants if need be, and as it is still lower than the fence itself, I decided to leave it alone.

And finally some miscellaneous bits of shed timber was used to add trim to the top of the panels, which also served to pin the plastic liner in place.

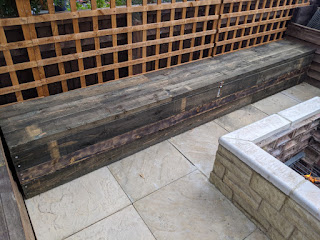
The wood was treated with normal fence stain/wood preservative.

The insides of the frame are lined with plastic sheet (which as it happens, is also up-cycled from some packaging.) and stood on some slab offcuts to protect the wood from moisture caused by contact with the wet soil.


Thursday, 22 July 2021

Fire Pit/BBQ Patio Area - Part 2 - The Reality

The plan for the firepit was scuppered by unavailability of materials due to Covid, so we had to rewind and reformulate the plan.

For the most part, the patio plan came together well, but we had use more slabs from the shed side for the base layer than we thought, because the greenhouse itself was cemented into the ground by metal supports, and not sat on a slab base as initially thought.

This in turn meant we were two slabs shy of what we needed, but we were able to source some that were close enough in appearance.


When it came to placing the concrete blocks, we realised we could use fewer than estimated by spacing them out differently, which gave us a spare at the end. It also allowed for us to dispose of hard rubble by using as filler between the blocks, and also allowed us to create airflow from the back of the patio to the firepit, which should help aid combustion.


When researching the best materials to use in a fire pit, a few things became obvious.

  • Don't use river rocks. They will likely contain moisture, which when heated, will cause steam, resulting in the rocks exploding. 

  • Regardless of whichever other material you consider, you will find some articles and advice saying it's a good material to use, and an equal number saying it's not.
  • One constant in advice advocating against any material is how it will degrade over time with the heat from the fire.

Therefore it seemed to me that the best course of action would be to use a material that is hard-wearing, but also fairly cheap and readily available, so that if the internet pessimists turn out to be right, it can easily be replaced.

For that reason I chose regular house brick as the lining wall. This wall should take the brunt of the heat, meaning I could use a more decorative stone for the outside.

A mix of brick sizes was used for the outer wall, both for aesthetic effect and it also helped fit the available space better.

The wall was topped off with white coping slabs with a mitre. The inner wall sticks out slightly from the coping, giving it a 'lip'. This is by design and will feed into a later project.

The finished patio and firepit. Still a few finishing touches to do, but perfectly usable as it is.

It wouldn't be a post about a firepit unless there was picture of some flames, would it?


Tuesday, 13 July 2021

Fire Pit/BBQ Patio Area - Part 1 - The Plan

I'm fortunate to have a great view over some fields at the bottom of my garden, and I plan to create a patio/barbecue/fire pit area so that I can make the most of it.

At risk of this becoming just another home improvement blog, I have set myself an additional challenge to differentiate it from all the other "I built a firepit in my backyard" projects all over the internet.

The challenge I have set myself with this project is to aim for 'zero-ish waste'. That is, there's inevitably going to be some waste, but to minimise it to the extent that there's no skip or trip to the dump required - to keep the waste minimal enough that it will go in the regular household bin collections. That means lots of re-purposing and re-using of what's already there - stuff that was left behind by the previous owners.

The fence that is currently at the bottom of the garden is in good condition, so I don't intend to remove or replace that, however at sitting-level, it's just high enough that it blocks the view. So the plan is to create a raised patio, so that eye-level when sat down is not obstructed.

Being a large household project, it was more important than ever for me to be able to communicate the project idea and plan to my partner, so I spent some time planning it out in OpenSCAD, to produce this 1 min animation.


The groundwork

The area that the patio will occupy originally contains a greenhouse, and some slabs that have been laid around it.


This will create a solid base without the need to dig foundations.

Fortunately, the slabs are all an even 60x60cm (or 2x2ft), which makes a convenient grid from which to base the design and measurements.

The plan is to leave the right-most column empty, where a planter will be put. The slab in the left-most, plus two slabs from the other side of the garden where the shed is, will be used to square-off the corner, effectively making a 6x4 square patio (12x8ft)


With this solid base created, concrete blocks will be placed to raise the new patio. Gaps will be left between the blocks to minimise the number that we need, with the space filled with any rubble left over from the build.


Slabs taken again from the other side of the garden (they are currently a base for the shed), will be moved over and concreted on top of the concrete blocks to create the raised patio.


Finally, the firepit rings are a purchased kit (sold as quarter circles). We will adapt them slightly so so that the circular wall sits at both ground level and on the patio. 


Unfortunately there was an unforeseen obstacle in the the fire-pit kit we were going to use was on a lengthy back-order, and we'd be unlikely to get one this year.

But still, the plan makes a good jumping-off point for a new plan.

To be continued...