Showing posts with label woodwork. Show all posts

Thursday, 28 November 2024

Memory Box with lid-triggered audio

After having our son, my partner wanted me to make her a memory box where she could keep all the trinkets and keepsakes from his birth.

As it is something of an old stereotype that such things would be kept in an old shoe box, I wanted to mimic that aesthetic.

The box is made from iroko, sides of approx 1cm, joined with box joints.
The base is simple hardboard, rebated into the sides.

I didn’t really want to add hardware such as hinges as I felt it would detract from the shoebox aesthetic, so I opted for a simple lift off lid.

The lid itself is made from a thicker piece of iroko, with trim added around the edges.

In order to provide a good friction fit, a piece of plywood, wrapped in t-shirt fabric, matching the boxes internal width and depth was added to the lid. This holds the lid on without rattling around, and incidentally hides the “bonus feature” of the box.

The bonus feature

Of course I can’t do anything normal like just make a box.

During his first few weeks, whenever our son sneezed, he would follow it up with a little noise that sounded like he was saying “oh..”. Of course it was incredibly cute and a memory we want to cherish forever.

What my partner didn’t know at the time, is I had managed to catch this on video, and I wanted to surprise her with it. 

A few years ago (around 2015-2016 I think), Sainsburys brought out a Christmas biscuit selection box which included a gadget for recording a message that would play when the biscuit tin was opened.

Somewhere along the line somebody I know must have got one, I scavenged the gadget from the tin once it was empty, and it spent the past few years sat in my electronics junk drawer, waiting for a project to be used in.


The circuit board is clearly designed as a disposable product – it is powered by 3 button cell batteries, which are riveted to the PCB itself. Whatever microcontroller powers it is hidden under an epoxy blob, and the only other notable features are a small microphone, speaker, a light dependent resistor (which is how it detects if the box is opened), and a small switch used to start and stop recording.

First thing to do was to drill out the rivets and get rid of the dead batteries.
Rather than replace them with more button cells, I opted for wiring in a AAA battery holder, I just had to follow the PCB traces and connect it at the right point.

 The microphone is pretty much as crap as you would expect for something of that size in a ostensibly disposable product, so I needed a better way to record the audio.


To do that I replaced the microphone with a 3.5mm jack and coupling capacitor. Once I’d copied over the recording, I removed that as well to save space, and also removed the record button to avoid overwriting.


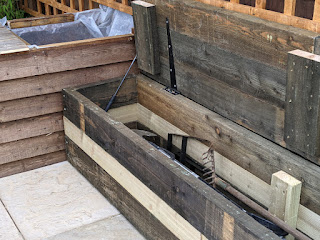
Then it was simply a matter of hiding the electronics in the box. This was done by carving out a hollow in the middle of the lid. The ‘inner lid’ of plywood that was also used to create a friction latch, added sufficient depth to the lid in order to hide the battery and PCB.

The underside of the lid with hollow for PCB/battery and speaker.


The t-shirt fabric that covered the inner lid also hid the circuitry, while also allowing enough light to pass through to activate the recording.


Tuesday, 11 April 2023

“Picture and Collection Bar”

This is another one of those projects I found on Pinterest & decided to make a DIY implementation of. The original pin describes it as a “picture and collection bar”.

Essentially using a wooden strip to trap marbles in such a way that they have a little movement but due to the sloped design will always try to move downward and towards the wall.

This means that if you push a piece of paper through the gap at the bottom, there is enough movement for the marbles to get out of its way but they will immediately roll down, providing just enough friction to hold the paper – but not enough friction to prevent you from easily removing the paper again if you need to.

It’s kind of like an ultra slim pin board, but without having to put holes in your paper.


Design
The original design I found used pretty thin strips that appear to be jointed it mitred angles.

Instead I opted for using a larger piece of oak, but then cutting out an angled gap for the marbles.

The cross section looks something like this:

Construction
The actual construction of this was very simple, just a series of rebate cuts on the table saw, occasionally making one of them angled, and making one very us at the bottom of the piece, so that when it’s up against the wall there is a slight gap as can be seen in the above diagram, which will allow paper to pass through.

Then I capped off the ends with a little piece of mahogany, to prevent the marbles from rolling out the sides – this is simply glued and pinned in place – and then finally some finishing.

As the piece of oak I was using was reclaimed and had a couple of screw holes, I patched one which looks a little bit like a knot in the wood, and the other two which were at the edges, I decided to patch using brass tacks, as the holes were in a position where if I were going to screw this to the wall I would have put holes anyway.

Mounting
The tricky part of this project is mounting it to the wall. My design does not have a back piece because I did not want it to protrude too far from the wall. The downside of this means until it is on the wall, the marbles could fall out the back.

So, firstly, I filled the back with some marbles.

 I then used gaffer tape across the back of the marbles and the lower part of the bar – leaving the side top bit exposed as this is where the adhesive is going to go. I left enough excess gaffer tape to be able to fold it round so that there was a ‘handle’ hanging off the bottom of the bar.

Obviously the next step is to mark out a position on the wall to mount it, make sure that it is level, etc. Then apply the glue to the back of the bar, and stick it to the wall.

Once you’re confident that the glue set, you can put on the gaffer tape ‘handle’, to peel the tape away from the marbles on the back, releasing them.


Result


Sunday, 27 February 2022

Flip-top bench for garden storage

Building on from the last fire-pit/patio project, the reason that I was not too worried about the mismatched slabs at the back of the firepit patio was because I knew that the aim was to put some bench seating there which would cover them over.

The slabs at the back were a mix of different styles and sizes to just provide a solid base and gap-fill


This project is to build that bench seating.

It will also serve as the new "shed", with a flip top lid where garden tools and such can be stored without needing an actual shed.

The width of the patio between the planters at each end is approximately 12 ft.


While it would have been possible to to get single lengths of timber that would cover the full distance, obviously this would look rather basic. 


Instead we settled on 8ft lengths which would allow us to create a staggered joint similar to that of brickwork, making a much more aesthetically pleasing finish.

We also opted for 2" thick lengths to prevent warping, and add weight and sturdiness.


The height and depth of the bench are based upon the measurements of existing regular garden benches that we already had, so we can be confident that they provide a good seat height. (~16-18 inches).

This is why the there is a mix of 4" and 6" wide.

The open lid and gas strut
(before burning)

The remaining lengths of timber were used to create supports on the inside of the bench, where each of the lengths were joined.


The lid/seat was mounted with 3 shed hinges. Obviously a lid of this size is quite heavy, so to aid lifting it, two boot-lid gas struts from a scrap car were mounted, one at each end.


The closed bench, showing the latch
(after burning)

A latch and padlock was also added, recessed into the front (so that it didn't catch peoples legs when sat down.)


Finally there was a colour difference between the 4" and 6" wood - the 4 being much lighter, so it was burned with a blowtorch so that it would fit in better.