Showing posts with label Bluetooth. Show all posts

Thursday, 10 December 2020

Live-edge oak spotlight light fixture - part 2 - adding ambience

In my previous post, I built a hanging light fitting of live-edge oak and recessed GU10 spotlights.

There is actually more to the project.

Sometimes, spotlights can be a bit overpowering, and it's preferable to have some ambient, indirect light.

During construction, I had the idea of creating this light in a way that would allow use of the spotlights, an ambient light, or both.

To create the ambient light, I used LED strips on the reverse (upward-facing) side, to reflect light off the ceiling.

I cut some thin strips of oak with a 45-degree angle and mounted them in a rectangle on the back - angled side outward, to help direct the light. An RGB LED strip was mounted all around this.

Control

I initially thought of using the LED driver that tends to come standard with rolls of LED strip, but as the existing wiring leads to only one switch, without some rewiring through the ceilings/walls, it would be limited to either having both the spotlights and the ambient light on, or just the spotlights on without the ambient light - it would not be possible to have the ambient light on without the spotlights.

In order to combat this, and to lay groundwork for a potential future project, I included a solid-state relay and an Arduino. The arduino would drive TIP31 transistors to drive the 3 channels for the LEDs red, green and blue, and additionally control a solid state relay which would act as the switch for the spotlights.

The idea would then be that the light switch would remain on, more like a utility switch, and then all control of the light fitting would be handed over to the Arduino.


Power


The original wiring sketch.
it's just a rough sketch,
not a proper wiring diagram.
 
The LED strips take 12V, and the microcontroller takes 5V, so a PSU is needed to bring the power down to usable levels.

For this I used an old net-book power supply. This was wired into the back of the light fitting. Caution is needed to make sure that nothing too powerful is used, as typically a houses' lighting circuit breaker is tripped at a much lower current than the mains sockets.


Revised to include the additional components
This would normally be plugged into a wall socket, where it's plug would have a fuse. However in order to wire this into the lighting wiring, the plug would need to be removed - obviously this introduces a safety concern. To ensure that this would still be fused, I replaced the wall switch for the light to one that includes a fuse, ensuring that the light is behind the fuse.


Communication

To communicate with the Arduino, I used a cheap HC-05 bluetooth to serial adapter, the same as I've used in other projects like the Bluetooth Macro keyboard app.

The arduino receives 4 bytes, followed by newline characters. These correspond to 1 byte each for the red, green and blue channels in the LED strip, and the final byte is either a simple 0 or 1 to indicate if the spotlights should be on.

For now this is sent by pairing with my phone and using a bluetooth serial terminal app from the Google play store. I'll probably create a more custom app in future, but for proving the concept, this works just fine.


Wednesday, 17 January 2018

App Update: Bluetooth Macro and Voice Input v2.1

A new version of the Bluetooth Macro app is available on Google Play


As much as I like gaming, one thing that irritates me is "Quick Time Event" button mashing game mechanism which requires the player to repeatedly bash a button usually in response to a cinematic event, for example:

Interrogation Scene - Metal Gear Solid

As protagonist Snake is interrogated, the player is required to mash a button to resist the electrocution.

Pooping - South Park: The Stick of Truth


A more immature example is mashing a button to poop.. it is South Park, after all.


So I've updated the Bluetooth Macro app to include a 'button mash' function.


Usage
The new functionality can be found by swiping left past the voice recognition section screen.

Enter the keys to send in the text-to-send box, and use the slider to set the frequency (The minimum is 1/sec, max 100/sec).

Note that while the app strives to keep these times as accurate as possible, there will be some limitations based on the hardware that you use.

Click start to begin 'mashing' the button - it will continue until you click stop.

Randomising time
A lot of third party game controllers can include a rapid-fire button that the player can simply hold down. Some games (such as MGS) could detect these (presumably because such a solution would send button presses at a predictable set interval, whereas a human player would have marginal inconsistencies in the spacing of the button presses.)

The randomise checkbox aims to overcome this by introducing a small variation between the keypress delays.


Support/Feedback
Unfortunately I'm not in a position to offer any kind of official support for this, so use entirely at your own risk. If you have any trouble with it, then feel free to get in touch, and I'll try to help as and when I can, but I make no guarantees!

Monday, 17 April 2017

App Update: Bluetooth Macro and Voice Input v2.0


The Macro Input System app has undergone a significant overhaul.

Macros are now stored in an internal database, and can have categories assigned.

Download

To create a macro
Select the menu, then Create Macro. Give the macro a name, short description, category and the actual macro content (in the same format as previous versions of the app), hit create.

If you have multiple macros in the same category, they will be nested in the macro list. Useful for keeping similarly themed snippets together – terminal commands, code snippets, etc.


To send a macro
Tap on the macro in the list. Alternatively, long press on the macro in the list, and from the pop-up, select Send. If you want to preview the text that will be sent before sending, tick the Preview checkbox. If you select this, then when you tap on the macro, a pop-up will appear displaying the text and ask for confirmation before sending.

To edit a macro
Long press on the macro in the list, and from the popup, select Edit, where you’ll be taken to the same screen as in the screenshot above and be able to edit the description, category and content.

To delete a macro
Long press on the macro in the list, and from the popup, select Delete.

To import macros from previous versions
There’s two way you can do this:

1) From the menu, select Create Macro, then from the options menu again, select Load from File. You’ll be presented with a file list as you would have in previous versions of the app. Navigate to the macro you want to import. The Create Macro dialog will populate with the name and content of the macro. From here you can edit the category and description, and save it to the database.

2) From the menu, select Quick Import. You’ll be presented with a file list as you would have in previous versions of the app. Navigate to the macro you want to import. The macro will be immediately imported, with the file name as it’s title, and “Quick Import” as it’s category. You can edit this later if need be.

Note that once imported, editing the macro will need to be done via the edit function outlined above. Changing the file on your phone will not update the macro.

 
Using Speech Recognition
Either hit the speech recognition button or swipe to access the Speech Recognition screen. On that screen, hit Start Voice Recognition to begin. When the prompt appears, start speaking. When you’re done, stop speaking, and the results will be processed, and a list will appear of options that the system thought it heard, starting with the highest probability.

If the recognised speech matches the name of one of your saved macros, it will be added to this list.
As with the other macros, tap to send the text.

You can also save speech recognition macros for later use – just longpress on the macro and select Save from the menu. They will be saved under the category “From Speech Recognition”


Support
As with all my apps, it is free, and as such, I am not in a position to offer any kind of official support, so use entirely at your own risk.
If you have any trouble with it, then feel free leave a comment or tweet and I'll try to help as and when I can, but I make no guarantees.

Thursday, 4 August 2016

App Update - Bluetooth Macro Input v.1.5


What's New
  • Command support - now send keystrokes for non-character keys - function keys, CTRL, ALT, etc.
  • Bug fix - Bluetooth no longer connects on application load - this prevents some crashing on open. Connection happens when the first bit of text is sent.
Usage
On first run, use the menu button, select settings from the menu and set the options you wish to use.

The most important settings to choose here are "Use Bluetooth Connection" and the bluetooth MAC address for your device. If you do not set a directory for storing your macro files, the default directory is a folder called "BluetoothMacroFiles" under your devices storage location (e.g. /storage/emulated/0/BluetoothMacroFiles).

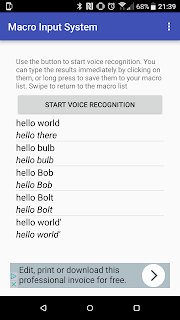
Once that's done, you can swipe between the two main screens. The first is the voice recognition screen. Tap the button, speak, wait for Google voice recognition to process your speech and a series of possible options are presented.
Tap your chosen option and the device will attempt to send that text through to the bluetooth adapter.

The second screen allows you to select a text file from the menu and send that via bluetooth. The new functionality allows you to define keystrokes for non-character keys - handy for sending commands. For example, a text file containing the following:

{F11}Hello World

will 'press' the F11 key, and then type "Hello World". The extra keys you can type in this manner are:
  • CTRL
  • SHIFT
  • ALT
  • RIGHT_CTRL
  • RIGHT_SHIFT
  • RIGHT_ALT
  • RIGHT_GUI
  • BACKSPACE
  • TAB
  • RETURN
  • ESC
  • INSERT
  • DELETE
  • PAGE_UP
  • PAGE_DOWN
  • HOME
  • END
  • CAPS_LOCK
  • RIGHT
  • LEFT
  • UP
  • DOWN
  • F1
  • F2
  • F3
  • F4
  • F5
  • F6
  • F7
  • F8
  • F9
  • F10
  • F11
  • F12
The arduino sketch adapter I use with the app is detailed here, and the hardware is a Pro Micro with a simple Bluetooth-to-Serial adapter.
In order to get the command functionality working I had to amend the arduino sketch - revised version below:


void setup() {
  Serial1.begin(115200);
  Keyboard.begin();
}

void loop() {
  if (Serial1.available() > 0) {
    byte inChar = Serial1.read();
    Keyboard.write(inChar);
    Serial1.write(inChar);
    delay(10);
  }
}


Support
As with all my apps, it is free, and as such, I am not in a position to offer any kind of official support, so use entirely at your own risk.
If you have any trouble with it, then feel free leave a comment or tweet and I'll try to help as and when I can, but I make no guarantees.

Get it on Google Play

Previous Versions
The original app
First update

Sunday, 30 August 2015

Writers Block Motivational Assistant

aka, electrocuting friends for fun and profit

One of my friends is a writer, and one of the common complaints I hear is that of “Writers block” - experiencing a creative slowdown and not being able to think of ideas to write.

I experience a similar thing with the projects I'm working on from time to time. A solution I've always sworn by is to just jump in and start doing something – even if it's crappy to begin with, it can always be edited later, and the process of actually taking action helps stir the creativity.

The discussion itself was enough for me to start thinking creatively for ways to overcome writers block. Think a cattle prod, combined with the movie Speed, and you get the idea.

As usual the full write up is below, or here's the video of it in action. Unfortunately there's not much to see, the shock wasn't strong enough to create much of a visible effect - it made my thumb twitch a bit, but seemed very dependent on where the electrodes were placed.


The hardware

As we're administering electric shocks to people with this project, in the interests of safety I didn't feel too comfortable DIY-ing the actual shock circuitry, so I picked up one of these reaction-test toys – the idea of the game each player holds one of the controllers, the light in the centre blinks red, as soon as it hits green, the last player to press their button gets a shock. Simple.
The shock game that's going to form a base for this project
The game in action

The bottom of the unit just contained the main switch, battery compartment and small speaker. None of these are needed in this project, so all found their way into the junk bin.

The top of the PCB just contains the main button (centre, surrounded by LEDs), a number of players button in the corner, and a few capacitors. The 4 LEDs around the edge were removed.


There was also a switch on the side which determined the severity of the shock - either a single one or multiple. I forgot to check which one was selected when I removed it, so that'll be a surprise when it's done. (This was connected to the green wires in the PCB picture below - effectively I've left the switch open)

I also cut away all the controller wires except for player one - that will be the one we're using.


The controller and it's circuitry


Interfacing & Software

How we're going to interface this is by wiring shut the player one button (so effectively it's always held down), and adding an optocoupler in place of the main game button. Then when receiving the signal to deliver a shock, a new game will be triggered, and player one will be shocked for pressing the button too early.


It looks like a steampunk torture device, but it works.
The wires on the controller side were re-wired to a couple of cheap pound-store bracelets, separated by a few 3d-printed plastic spacers and held together with copious amounts of hot glue.


The typical next step here would be to wire in a microcontroller, usb-serial converter and have the PC direct output that way, but I've done that dozens of times and felt like doing something different, so I'm going to use bluetooth and a Wiimote.

The Wiimote connects via bluetooth and contains several sensors. In truth, it's overpowered for this project, but it does give plenty of room for expansion in the future. We're going to use the vibration motors connections to link up to the shocker.


The dismantled Wiimote we're going to use

The connection itself is very straight-forward - a simple optocoupler between the shock toys' main 'play' button connections and the vibration motor output on the Wiimote.

Power is obtained with a 5V wall-wart supply, brought down to 3.3V for the Wiimote using an LM317.

The finished box and bracelet
The software
The source code for the application can be found on Github. Uses Bluecove and MoteJ libraries.

Update
The initial bracelet didn't work to well in testing, as the angle made it difficult to ensure both sides of the connection were in contact with the arm, so I put together an alternative using an old sweat band with a couple of pennies glued into it.

Inside

The new shock band


Saturday, 18 July 2015

In-car Bluetooth Stereo Mod

As the past few projects have been quite frivolous gadgets, this time I'm going to do something practical. It turns out this was actually one of the quicker projects I've done and makes a decent weekend project for anyone looking to make a quick upgrade to their cars audio system.

My car as an auxiliary audio input for connecting MP3 players etc. For this I purchased a bluetooth speaker adapter on Ebay for about a tenner.


It's a great device to connecting my phone for sat-nav, music etc, but there's a small annoyance in the fact that after getting in the car, it requires me to press and hold the power button for about 5 seconds before it'll turn on and connect to my phone. It's a bit of a first-world problem, granted, but it's kinda irritating, so I've been thinking about how to solve it.

Ideally, it should function like a built-in bluetooth adapter does in many new cars - as soon as the car is powered on, the bluetooth is powered on and connects to the phone.


After some experimenting with various approaches - microcontroller delays, 555 timers, I found the most functional circuit was a simple capacitor delay circuit, combined with a transistor NOT gate & optocoupler, so that the optocoupler is active, effectively holding down the adapter's power button, for 5 seconds, then switched off until the circuit loses power.


A rough schematic of the circuit I used


The completed circuit on top of the bluetooth adapter
Inside the bluetooth adapter.


Powering the circuit was simple enough - I already have a car 'cigarette lighter' to USB adapter with 2 USB ports - one powers the bluetooth adapter, and it powers on with the car ignition, so I added a USB plug to the timer circuit and used that.

Finally, I didn't want to leave exposed wires or circuit boards visible in the car - knowing my luck some paranoid idiot would freak and call the bomb squad or something, so I 3D printed a simple box enclosure which houses the adapter and the circuit nicely, the box itself nestling neatly in the centre console of my car.
The finished adapter in it's 3D printed box, ready to put in the car

Wednesday, 30 July 2014

App Update: Bluetooth Macro Input

The Bluetooth Macro Input app has been updated and is now available on Google Play.

New Features

As well as it's existing ability to send text files stored on phone, it is now possible to use voice recognition to transcribe voice to text and send that text via bluetooth in the same way, effectively allowing your phone to act as a dictation machine for your computer, without needing to install additional software on your computer.

Please note the voice recognition uses Google's voice recognition API. As a result, I do not have any control of the quality or accuracy of the voice recognition. It does also mean that Internet access is required to use the voice recognition feature.

Usage guide for the original file-based macro system can be found here.

Requirements Changes

Companion hardware is still required, see the original post for details.

The minimum required version of android is now Honeycomb (Android 3.0)


Thursday, 22 May 2014

Android App: Bluetooth Macro Input

UPDATE - Please note this version of the Bluetooth Macro Input app is no longer supported. Although it's still on the Play store, it will not be updated in future. Please consider migrating to the new Bluetooth Macro and Voice Input app instead.
 
A while ago I posted this snippet of Arduino code for an upcoming project. Unfortunately with a looming redundancy and several courses on the go at the moment I've not had the free time to follow up until now.

All the code does is read a character from the serial pins of the arduino, then outputs that character as a keyboard keystroke using the keyboard emulation functionality of the Arduino Leonardo variants.

The rest of the hardware is very simple - just a bluetooth serial module, such as one of these - connected to those pins. There's just 4 pins - power, ground, TX and RX.

With that done, and the arduino sketch uploaded, the rest of the work is in the android application, which is now available for download by clicking the button below.


What it does
You can provide a library of snippets of text on your devices external storage (any ASCII filetype is fine), and then this app can access them, and send them via bluetooth to the arduino hardware, which emulates a USB keyboard and types the contents out.
This is handy for maintaining a library of code/command snippets that you might want to use across different computers or devices. (Or if, say, your day job requires you to often type the same thing on a computer that you have little control over software/config wise...)

Requirements
  • The hardware described above.. Without it, the app is kinda pointless.
  • Supports versions of android from 2.2 (Froyo) upward, though only tested on a Samsung Galaxy S3.
  • Bluetooth serial device (115200 bps)
  • Permissions
    • Requires bluetooth and external storage access.

Usage

To run the app, first turn on bluetooth.
When you first run the app, you'll need to enter the MAC address of your bluetooth device - you should be able to find this in the docs of your serial device (or printed on it). Once done it should automatically connect.
Create or move your text snippet files to the a folder on the SD card under BluetoothMacroInput directory.
Use the Menu key in the app to bring up the menu, which is basically just the folder structure of the directory - click on your chosen file and it'll load it into the text view. Click 'Type' to have the device start typing your text.
Depending on your external hardware, you might need to adjust the delay value (if the typed text is garbled, then you need to increase the number)


Future Development plans
  • One-button input for frequently used commands.
  • Mouse emulation using phone touchscreen/sensors
  • Dynamic macro recording (using USB host passthrough for a keyboard)
  • General UI improvements..

Support/Feedback
Unfortunately I'm not in a position to offer any kind of official support for this, so use entirely at your own risk. If you have any trouble with it, then feel free to contact me on twitter/G+/leave a comment, and I'll try to help as and when I can, but I make no guarantees!

Any feedback, particularly with compatibility on different hardware (both android devices and Bluetooth/keyboard hardware) will be much appreciated.