The Macro Input
System app has undergone a significant overhaul.
Macros are now
stored in an internal database, and can have categories assigned.
Download
Select the menu,
then Create Macro. Give the macro a name, short description, category
and the actual macro content (in the same format as previous versions
of the app), hit create.
If you have multiple
macros in the same category, they will be nested in the macro list.
Useful for keeping similarly themed snippets together – terminal
commands, code snippets, etc.
To send a macro
Tap on the macro in the list. Alternatively, long press on the macro
in the list, and from the pop-up, select Send. If you want to preview
the text that will be sent before sending, tick the Preview checkbox.
If you select this, then when you tap on the macro, a pop-up will
appear displaying the text and ask for confirmation before sending.
To edit a macro
Long press on the macro in the list, and from the popup, select Edit,
where you’ll be taken to the same screen as in the screenshot above and be able to edit the description, category and content.
To delete a macro
Long press on the macro in the list, and from the popup, select
Delete.
To import macros
from previous versions
There’s two way you can do this:
1) From the menu, select Create Macro, then from the options menu
again, select Load from File. You’ll be presented with a file list
as you would have in previous versions of the app. Navigate to the
macro you want to import. The Create Macro dialog will populate with
the name and content of the macro. From here you can edit the
category and description, and save it to the database.
2) From the menu, select Quick Import. You’ll be presented with a
file list as you would have in previous versions of the app. Navigate
to the macro you want to import. The macro will be immediately
imported, with the file name as it’s title, and “Quick Import”
as it’s category. You can edit this later if need be.
Note that once imported, editing the macro will need to be done via
the edit function outlined above. Changing the file on your phone
will not update the macro.


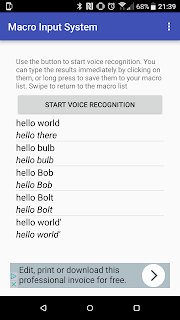
Using Speech
Recognition
Either hit the speech recognition button or swipe to access the
Speech Recognition screen. On that screen, hit Start Voice
Recognition to begin. When the prompt appears, start speaking. When
you’re done, stop speaking, and the results will be processed, and
a list will appear of options that the system thought it heard,
starting with the highest probability.
If the recognised speech matches the name of one of your saved
macros, it will be added to this list.
As with the other macros, tap to send the text.
You can also save speech recognition macros for later use – just
longpress on the macro and select Save from the menu. They will be
saved under the category “From Speech Recognition”
Support
As with all my apps, it is free, and as such, I am not in a position to offer any kind of official support, so use entirely at your own risk.
If you have any trouble with it, then feel free leave a comment or tweet and I'll try to help as and when I can, but I make no guarantees.
Support
As with all my apps, it is free, and as such, I am not in a position to offer any kind of official support, so use entirely at your own risk.
If you have any trouble with it, then feel free leave a comment or tweet and I'll try to help as and when I can, but I make no guarantees.


No comments:
Post a Comment