Wednesday, 7 September 2016

App Update - Soundboard Version 1.7


What's New
  • DTMF Tone generator
  • Bug fix - playback volume level didn't change after initial set, now fixed.
  • Bug fix - Text-to-Speech playback ignored the playback volume level, now fixed.

Usage

On open the user will be presented with three buttons to load the following sections. or alternatively swipe between them:
  • Load files from Storage - This will load the regular soundboard as in previous versions and display the files in a list ready for playback. Note, if you swipe across to the soundboard screen from the start of the app, you will need to select Load from the options menu to populate the list.
  • Generate speech from Text - This will load the text-to-speech interface, where they can enter text and play it back to inject custom phrases into their soundboard.
  • DTMF Tones - This new feature allows you to generate DTMF (dual-tone multi frequency) tones - which are the noises generated when pressing the numerical buttons on a telephone keypad. Useful for, say, messing with annoying robocallers.
Support
As with all my apps, it is free, and as such, I am not in a position to offer any kind of official support, so use entirely at your own risk.
If you have any trouble with it, then feel free leave a comment or tweet and I'll try to help as and when I can, but I make no guarantees.


Thursday, 4 August 2016

App Update - Bluetooth Macro Input v.1.5


What's New
  • Command support - now send keystrokes for non-character keys - function keys, CTRL, ALT, etc.
  • Bug fix - Bluetooth no longer connects on application load - this prevents some crashing on open. Connection happens when the first bit of text is sent.
Usage
On first run, use the menu button, select settings from the menu and set the options you wish to use.

The most important settings to choose here are "Use Bluetooth Connection" and the bluetooth MAC address for your device. If you do not set a directory for storing your macro files, the default directory is a folder called "BluetoothMacroFiles" under your devices storage location (e.g. /storage/emulated/0/BluetoothMacroFiles).

Once that's done, you can swipe between the two main screens. The first is the voice recognition screen. Tap the button, speak, wait for Google voice recognition to process your speech and a series of possible options are presented.
Tap your chosen option and the device will attempt to send that text through to the bluetooth adapter.

The second screen allows you to select a text file from the menu and send that via bluetooth. The new functionality allows you to define keystrokes for non-character keys - handy for sending commands. For example, a text file containing the following:

{F11}Hello World

will 'press' the F11 key, and then type "Hello World". The extra keys you can type in this manner are:
  • CTRL
  • SHIFT
  • ALT
  • RIGHT_CTRL
  • RIGHT_SHIFT
  • RIGHT_ALT
  • RIGHT_GUI
  • BACKSPACE
  • TAB
  • RETURN
  • ESC
  • INSERT
  • DELETE
  • PAGE_UP
  • PAGE_DOWN
  • HOME
  • END
  • CAPS_LOCK
  • RIGHT
  • LEFT
  • UP
  • DOWN
  • F1
  • F2
  • F3
  • F4
  • F5
  • F6
  • F7
  • F8
  • F9
  • F10
  • F11
  • F12
The arduino sketch adapter I use with the app is detailed here, and the hardware is a Pro Micro with a simple Bluetooth-to-Serial adapter.
In order to get the command functionality working I had to amend the arduino sketch - revised version below:


void setup() {
  Serial1.begin(115200);
  Keyboard.begin();
}

void loop() {
  if (Serial1.available() > 0) {
    byte inChar = Serial1.read();
    Keyboard.write(inChar);
    Serial1.write(inChar);
    delay(10);
  }
}


Support
As with all my apps, it is free, and as such, I am not in a position to offer any kind of official support, so use entirely at your own risk.
If you have any trouble with it, then feel free leave a comment or tweet and I'll try to help as and when I can, but I make no guarantees.

Get it on Google Play

Previous Versions
The original app
First update

Sunday, 10 July 2016

3D Scanner


Background
So, the technique I covered in a previous post for copying 3D objects from photographs works well if the object you're trying to copy is fairly flat, but it's not really suitable for more nuanced and complex objects.

For the past few years I've been working on a game, on-and-off, and while I'm fine with the programming side of most game engines, 3D modelling is something of a downfall for me.

I am also working with non-technical people to design the game, so rather than them design characters and I then re-create them as best I can in Blender, what if I could them use real-world everyday objects to model the characters, and then scan them into a 3D mesh?


Hardware
The scanner is going to comprise of three main parts:
  • The platform/turntable. Made from old bike parts, a bearing plate taken from one of those rotating laptop tables, and a windscreen wiper motor.
  • The line-laser. A laser pointer and a wine glass. I will 3D print a mount for more accurate positioning.
  • A camera. A simple webcam will suffice. Higher resolution the better, though to begin with I'll be working with whatever I have to hand.

Software
I am creating some image processing software for a different project (my dissertation), which has some common processes to what will be required for this, so once that's done I will be able to re-use some of the generic code for this project.

I'll be programming in Java, the webcam will be accessed using the Sarxos Webcam-Capture library, and the 3D aspects will be implemented using the JMonkeyEngine games library.

A photo posted by Anthony (@darkmidnight_diy) on

Platform/Turntable

One of the key measurements for being able to create a 3D mesh from a system like this is knowing the amount of rotation. A common way to knowing this would be to use a stepper motor - each step being x degrees of rotation.


A photo posted by Anthony (@darkmidnight_diy) on

As I'm using a 'dumb' windscreen wiper motor, I can't use this method. What I plan to do is use a optical rotary encoder (like the kind found in mouse scroll wheels), so that I can mark each complete rotation of the turntable.

From there, I can look at the number of webcam frames obtained, and divide 360 by the number of frames, to get the degrees per frame (this is assuming that the motor speed stays constant, as does the webcam frame rate. The motor is not variable speed, and the webcam frame rate can be controlled in software, so I don't forsee this being an issue)


Line-laser
The laser itself is a standard red laser pointer, nothing special. However for this task, I need a line, not a dot. Shining the laser through a glass stem refracts the light in such a way as to produce a line.

However the positioning is quite critical - the laser has to line up with the centre point of the turntable, and be angled through the glass so that the bottom of the line is on the turntable.


Saturday, 28 May 2016

App Update - Soundboard Version 1.5.1


What's New
  • Text-to-speech support added to enable use within the soundboard.
  • Intro screen provides more detail about usage, front screen button auto loads file list on main soundboard.

Usage
 
On open the user will be presented with a two buttons, one will take them to the new Text-to-speech interface, where they can enter text and play it back to inject custom phrases into their soundboard.

The second button will load the regular soundboard as in previous versions, but will automatically load the files into the list (no need to select Load from the options menu).

It is also possible to swipe between the screens as well, so pre-recorded audio can be mixed with TTS-generated speech.

Note, if you swipe across to the soundboard screen from the start of the app, you will need to select Load from the options menu to populate the list.


Support
As with all my apps, it is free, and as such, I am not in a position to offer any kind of official support, so use entirely at your own risk.
If you have any trouble with it, then feel free leave a comment or tweet and I'll try to help as and when I can, but I make no guarantees.


Tuesday, 15 March 2016

New App: Soundboard


My latest Android app is now available on Google Play.

https://play.google.com/store/apps/details?id=com.darkmidnight.soundboard&hl=en_GB


A simple soundboard application. Save some MP3 or OGG files to your phone, load up the app and play them at the touch of a button.

Tap the file names to play

To keep the sound playback levels constant, the app allows you to set a volume level independent of the current volume. On playback, the app sets the volume to that level, plays the sound clip, then returns the volume to it's previous level.

Designed to be used with phones using an adapter such as the one described in my previous post, the app also works well with Xbox Live headsets (Xbox 360), and in theory should work with any device you're capable of connecting your phones audio output to.

The app was built for and tested on an HTC One M9, but should work with any recent flavour of Android.


Usage
Initially, copy the audio files to your devices storage, into a directory called SoundboardFiles.
Open the app, hit the menu button and select load, and you'll get a list of the files as in the first screenshot above.
Go to preferences in the menu and you'll be able to choose whether or not to dynamically set the volume level on playback, and set the volume level if you so wish.

Going back to the main screen, simply tap the filenames to play the file (the app will deal with the volume adjustments automatically.

The volume control menu
If you're struggling to find audio clips to use in the 
See this post for a guide on creating sound clips from YouTube videos and other online sources.

Support
As with my other apps, it is free, with a simple ad banner at the bottom of the main screen.
As such, there is no official support, although I will respond to any comments via this site or twitter as best I can.

Saturday, 5 March 2016

Audio interface for VOIP phones and XBox Live


Update
An unintentional (but useful) outcome of this project is that the connector used in this project is the same as the one used on Xbox 360 headsets, so this same device could be used to inject audio, such as a soundboard, into your in-game chat.

Original post below:
 
I got asked to build another phone audio interface for a colleague who spends a lot of time on the phone and wanted a way to play back pre-recorded audio to save repeating himself.

Unfortunately the existing one I build before is for traditional POTS (plain old telephone system), but the office uses VOIP phones.

I don't have a spare VOIP phone to mess with, so had to look at other options.

The normal headset jack
The phone has a headset port, using a 2.5mm jack socket, and the headsets plug has 3 rings. Given the the headsets themselves consist of just a microphone and earpiece, it stands to reason the pinouts are mic, speaker, and ground.

I don't have the actual pinout for this particular brand of headset, but I have worked with similar ones in the past and typically the tip is the microphone, ring is speaker, and base is ground.


I don't have one of those connectors to hand, but found a stereo headset one from an old hands-free kit. That it has an additional ring connection (for the 2nd audio channel) doesn't matter, it'll effectively join up with ground anyway.

In addition to being able to inject audio into the call, we still need to be able to use the phone normally, so I've used an XBox 360 controllers headphone port to provide a passthrough for the phone headset.


The quick hand-drawn wiring diagram I used. An artist I am not.

Testing this circuit revealed a slight problem, having both the audio source and microphone connected resulted in the microphone becoming inaudibly quiet. In hindsight, this is likely due to the audio source being amplified and the mic not. A simple switch added to the circuit to allow quick switching fixed that.

Adding a simple switch at this point sorted the problem.


The finished adapter in the obligatory tic-tac box


Thursday, 28 January 2016

Copying objects for 3D printing without a 3D scanner


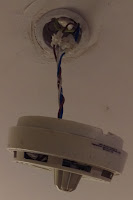
Over the holidays I broke the smoke alarm in my flat. Not the smoke alarm itself as such, but the mount that held it to the ceiling. Judging by the amount of various adhesives that were on the mount, it looks as though a previous occupant had actually broken the mount, but bodged together enough adhesive to hold it tenuously in place until they left.

It still works, thankfully, but it's just hanging from it's power lead.


First of all, take photos of the object against a plain background. Ideally pick a background which contrasts well against the object that you're trying to copy.


Editing the image in GIMP/Photoshop
Open the image in a photo editor, and crop any unnecessary bits out the picture.

Create a translucent layer above the current layer, so that you're working on the new layer, but can see through to the photo.
Use the paths tool to trace around the object as best you can, invert the selection and delete the contents. This should remove all the surrounding background bits.

Use the paths tool a few more times to create the cut-outs you require - for example in my case it's removing the centre piece and the screw holes.
Then make the working layer opaque, and fill the outline shape with a colour.

Save and export this image as a PNG.

OpenSCAD is meant to be able to import and extrude PNG files directly, but I've found it to be unreliable, so the below is a workaround that I've been using.

Converting to SVG using Inkscape
Open the edited image into a vector graphics editor, such as Inkscape.

Click on the image, right click and select "Trace Bitmap". Select "Edge Detection". If the image being used is simple enough, you can leave the default values, click OK, and then close the menu.

Drag the bitmap out the way (you can delete it now), and you should be left with an outline of the object. Fill the outline with a colour to make the object solid.


Save this SVG file.

Extruding the file in Blender
Open Blender.

Go to File, Import, Scalable Vector Graphics (SVG). Find the file and select it.
You may have to zoom quite far in to see the imported object.


Select the object and move it slightly,  you'll see a second outline object that gets left behind. Click on the outline object and delete it, you don't need it here, then replace the rest of the object.


Next we need to set the units of the object, so that we can scale it properly. Click the Scene properties tab on the right, and select Metric or Imperial from the units section.

Next, we scale the object.


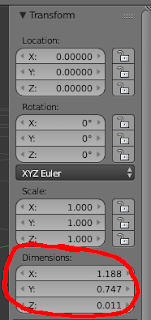
Press N to bring up the information about the object, and get the dimensions.

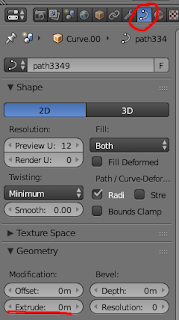
Set the X and Y scale here, but for the Z axis we need to extrude the flat image into a 3D object.

To do this, go to the right hand side and select object data, geometry, extrude.

In the case of my project, I added a couple of extra objects to recreate the latches which were broken off the original mount.


Once this is done export to STL and you have a file ready to send to the 3D printer.

Left, the original broken mount, and right, the 3D printed replacement.