Monday, 17 April 2017

App Update: Bluetooth Macro and Voice Input v2.0


The Macro Input System app has undergone a significant overhaul.

Macros are now stored in an internal database, and can have categories assigned.

Download

To create a macro
Select the menu, then Create Macro. Give the macro a name, short description, category and the actual macro content (in the same format as previous versions of the app), hit create.

If you have multiple macros in the same category, they will be nested in the macro list. Useful for keeping similarly themed snippets together – terminal commands, code snippets, etc.


To send a macro
Tap on the macro in the list. Alternatively, long press on the macro in the list, and from the pop-up, select Send. If you want to preview the text that will be sent before sending, tick the Preview checkbox. If you select this, then when you tap on the macro, a pop-up will appear displaying the text and ask for confirmation before sending.

To edit a macro
Long press on the macro in the list, and from the popup, select Edit, where you’ll be taken to the same screen as in the screenshot above and be able to edit the description, category and content.

To delete a macro
Long press on the macro in the list, and from the popup, select Delete.

To import macros from previous versions
There’s two way you can do this:

1) From the menu, select Create Macro, then from the options menu again, select Load from File. You’ll be presented with a file list as you would have in previous versions of the app. Navigate to the macro you want to import. The Create Macro dialog will populate with the name and content of the macro. From here you can edit the category and description, and save it to the database.

2) From the menu, select Quick Import. You’ll be presented with a file list as you would have in previous versions of the app. Navigate to the macro you want to import. The macro will be immediately imported, with the file name as it’s title, and “Quick Import” as it’s category. You can edit this later if need be.

Note that once imported, editing the macro will need to be done via the edit function outlined above. Changing the file on your phone will not update the macro.
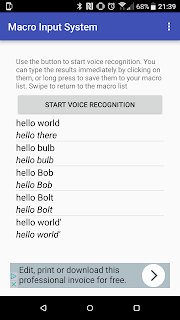
 
Using Speech Recognition
Either hit the speech recognition button or swipe to access the Speech Recognition screen. On that screen, hit Start Voice Recognition to begin. When the prompt appears, start speaking. When you’re done, stop speaking, and the results will be processed, and a list will appear of options that the system thought it heard, starting with the highest probability.

If the recognised speech matches the name of one of your saved macros, it will be added to this list.
As with the other macros, tap to send the text.

You can also save speech recognition macros for later use – just longpress on the macro and select Save from the menu. They will be saved under the category “From Speech Recognition”


Support
As with all my apps, it is free, and as such, I am not in a position to offer any kind of official support, so use entirely at your own risk.
If you have any trouble with it, then feel free leave a comment or tweet and I'll try to help as and when I can, but I make no guarantees.

Tuesday, 28 March 2017

New Web App: Target Creator


Quick Link

The application can be found at http://targetcreator.darkmidnight.co.uk
http://targetcreator.darkmidnight.co.uk


About
 
Years ago I used to have an air rifle and spent a lot of time target shooting. When I wasn't competing, I'd enjoy coming up with different target arrangements and challenges to add variety – some favourites included things like popping balloons, trying to snap a thread to drop a weight (cowboy-movie hangman style), and trying to shoot through the centre spindle hole of a CD without touching the disc itself (Remember those AOL promotional CDs they’d put through the door? Guess where mine went..)

This was about the same time that I was learning to program, so naturally the two hobbies intersected, and one of the first applications I wrote was a target creator that not only allowed me to print paper targets from home, but also customise them by changing the diameter of the rings/bullseye, change colours, put multiple smaller targets on a single page, etc.

The application was a Java desktop application – nothing particularly ground breaking, but for an early project, I was proud of it.

Fast-forward to a few weeks ago, and I was sorting through a bunch of old stuff in storage, and happened to find a printout of a couple of pages of the programs source code (I don’t remember why I printed it, but apparently I did). Hit with a wave of nostalgia, I thought I’d rebuild a modern version of it.

In the years since I made the original, many desktop applications have given way to the rise of web-apps, so I decided to take it in the same direction. The core of the new version is rebuilt from the original, but as a web-app, it doesn’t have direct access to printers, so now it produces a PDF instead. I also added in a QR code function so that you can in effect ‘save’ chosen settings for a target to return to it to print more later, and the ability to switch between A4 and US Letter sized paper.

The application can be found at http://targetcreator.darkmidnight.co.uk

Usage
  • Select your chosen unit of measurement – imperial (inches) or metric (centimetres)
  • Select your paper size - A4 or US Letter
  • Set the first rings diameter, and select it’s colour.
  • Either select “Use the same thickness for all rings” or repeat the above for rings 2-9, also selecting their colours.
  • Do the same for the bullseye.
  • Chose your additional options – either a single target centered on the page, or fit as many as possible onto the page.
  • Choose if you want a QR code appended to the corner of the PDF to easily recall your chosen settings.
  • Then click Generate to produce the PDF, which you can then print.

Sunday, 12 March 2017

Farcry-inspired Leather Notebook part 2

In my last post, I started making a leather notebook inspired by Farcry. For the first part of this build, click here.


Paper
I opted to use a mix of papers in the notebook, so it could be useful in multiple situations - I included lined, plain, squared, and sketch (plain, thicker stock paper).


Pen Loop
I wanted to get some practice using hardware with the leather, so I used a scrap of leather of approx 1 inch width, wrapped it around a pen for size, and trimmed it to create a pen loop, which I fixed to the left of the notebooks cover flap, so it would sit in the fold opposite the spine, which will help balance out the overall thickness of the notebook (to help achieve the stated aim of keeping it pocket-size).

The Cover

I shaped the cover with a curve, and added an eyelet hole. This is to thread a leather lace to act as a closure for the book.

The lace itself, was literally a leather shoe lace - I had to cut it short, and slice it lengthways to fit the eyelet.


The Farcry journal had a small metal charm-type item on the end of the lace, which serves as kind of latch mechanism, as well as having it's aesthetic appeal.

I didn't have anything particularly symbolic or meaningful, but I did have a small hollow metal die that came from a Christmas cracker, and a metal hook. I filled the hollow die with contact cement and screwed in the hook, giving it time to set, then tied that into the other end of the lace.


The finished notebook

A post shared by Anthony (@darkmidnight_diy) on

Despite the caption, I think this project will be one I never really consider 'finished'. There are plenty of things I would change if I re-did the project, but given that this is my first attempt at making something with leather, I'm very pleased with how it's turned out. I'll definitely be keeping leather work in my repertoire.


I envision that as a project book, it will be modified and tinkered with as I learn new things and will be a bit of a 'test bed' - two things that immediately spring to mind is the finishing of the materials' edges, and embossing a logo or emblem into the cover.


Sunday, 5 March 2017

Farcry-inspired Leather Notebook

This year I resolved to pick up a new skill.

A key game mechanic in Farcry 4 is the survival and "living-off-the-land" aspect of the fictional island of Kyrat. Part of this aspect is hunting, and using the pelts to craft useful items, such as backpacks, holsters etc.


That, coupled with seeing some leatherwork done by Jimmy DiResta in his videos, inspired me to have a go and teach myself some leathercraft.

For a first project, I decided to make a leather notebook, based of this faux-leather journal that came with the collectors edition of Farcry 4 (left).

I'm the kind of person whose idea of a notebook is usually a sheet of printer paper folded into four. I usually start using a notebook, only to find various flaws that stop it fitting into my workflow - like being too large to fit in a pocket, getting left behind, nowhere to add additional sheets, etc. So this seems like a good chance to make something exactly how I want it.


Spec

Essential:
  • Refillable using cheap paper (ie, printer paper folded into four)
  • Fit in the back pocket of a pair of jeans.
Other nice-to-haves:
  • Mix of paper - it'd be handy to have lined, plain, squared/graph paper in one notebook.
  • Space for printouts/other paper - some kind of pocket.
  • Pen loop
Process
The size was based around a sheet of A4 paper folded into quarters, with approximately 1 inch added for the spine.


Another layer of leather was added in the spine to strengthen it, and fixed with contact cement.
Four loops of thread, stretching from top to bottom of the spine were added, approx a quarter inch apart. This will be where the paper is mounted - either I can use it for four different types of paper, or treat it as four sections for different projects.


A second outer layer of leather was added to the back, the same height as the main section, but wider (total width approx 300mm. This excess piece would create the wrap-around cover for the book.)


I misjudged the behaviour of the main front and back cover - I thought that the double layer of leather would behave as though they were a single, thicker layer. However, I found when folding them, the inner layer would bulge out slightly, so I was concerned about using contact cement to join them.

Although this did create an opportunity - stitching each side and the base of each cover meant that I could leave the tops open and create pockets for printouts and other papers.


This finished off the main structure of the notebook, with the next steps being to refine it and add finishing details (and of course, paper), which I will cover in a later post (Update - Part 2 is here)


Sunday, 12 February 2017

App Update: Soundboard 1.8.0

A new update to the Soundboard application on Google Play has been released.

What's New
A new Tone Generation feature, which allows the user to generate sine-wave tones and play them back.
Also a bug fix - on the DTMF screen, swiping between the screens would effectively have the effect if the DTMF buttons being stuck in a pressed state, causing a continuous playing of the tone. The layout of that screen has been amended to reduce the occurrence of this happening.

Usage
From the app's start screen, use the Tone Generator button, or swipe across to access the tone generation module. On that screen, use the slider or text box to select your chosen frequency, set the duration, and hit generate to play the tone The module is also subject to the volume controls of the rest of the application - go to preferences in the menu and you'll be able to choose whether or not to dynamically set the volume level on playback, and set the volume level if you so wish.

Support
As with all my apps, it is free, and as such, I am not in a position to offer any kind of official support, so use entirely at your own risk.
If you have any trouble with it, then feel free leave a comment or tweet and I'll try to help as and when I can, but I make no guarantees.

Download

Saturday, 28 January 2017

Reclaimed Wood Kitchen Tidy


I live in a small flat, and in the kitchen there's not a lot of storage. As a result, the bins (general waste & recycling) have always just lived in the corner of the room. It's not a major issue, but bins aren't exactly nice to look at, made worse given that it's an open plan kitchen shared with the lounge area.

I found a couple of solid wood bedframes that were otherwise destined for the landfill, and took them apart, and used the timber to build this kitchen tidy unit. There's not really any new or ground-breaking techniques to document, so the rest of this is predominantly a photo post.

I'm pleased with the result, and I plan to do more reclaimed wood projects in the future - as all the timber was reclaimed, the only material cost ended up being the wood dye and varnish, which makes woodworking much more affordable.


A photo posted by Anthony (@darkmidnight_diy) on


Wednesday, 4 January 2017

Archer and "The Last Leg"-inspired 'Phrasing' button


The inspiration


In some ways my workplace is very much like this - anything that could be misconstrued as an innuendo, even remotely, will inevitably have people calling out "hey, phrasing!", "That's what she said..." etc, etc.

Combining that with this "Bullshit button" from The Last Leg:


.. and I had an idea.


To cap it all off, at work we were having a clear out of some cupboards, and I found this:


It plays a dog-barking noise when pressed. I'm told it was used for some kind of team building thing long before I joined the company. Weird.
By this point it must be pretty obvious where this project is headed...

The teardown
First things first, see how much space in the button there is to work with, and what parts can be reused.

The single PCB contains a controller under a blob of epoxy, as was expected, so I'll need to replace that. However, the same PCB contains the actual button, so it'll need to stay in place. To allow that I just cut the traces connecting the button to the PCB, and scraped off some of the solder mask in order to provide connection points for my replacement controller.


The electronics

As this was intended to be a quick and easy project, I had to make do with what I could find in my electronics junk box. I couldn't use the same MP3 trick that I used in the Swear Jar project, as what I had available was too large for the buttons' case.

Whichever controller I used needed to have enough memory to store the audio data, which ruled out a lot of micros, so I ended up recycling an old arduino micro (ATMega328)

To make room for the arduino, the battery compartment had to be removed - I would instead use coin cell batteries. This would still work, but come at the cost of a reduced battery life.

The audio

To capture the original audio, I used the same technique I covered here to create a WAV file. After using Audacity to crop and edit down the relevant clip (Archer saying "Uh, Phrasing"), I used the EncodeAudio application from HiLoTech to turn it into a header file (sounddata.h in the code below)


The software
The code used on the arduino was based around the PCMAudio example, but I needed to modify it to incorporate some power saving - to account for the reduced capacity of the coin cell batteries. Code listed below:

#include <stdint.h>
#include <avr/interrupt.h>
#include <avr/io.h>
#include <avr/pgmspace.h>
#include <avr/sleep.h>
#define SAMPLE_RATE 8000

#include "sounddata.h"

int ledPin = 13;
int speakerPin = 11;
volatile uint16_t sample;
byte lastSample;


void stopPlayback() {
    TIMSK1 &= ~_BV(OCIE1A);
    TCCR1B &= ~_BV(CS10);
    TCCR2B &= ~_BV(CS10);
    digitalWrite(speakerPin, LOW);
}

ISR(TIMER1_COMPA_vect) {
    if (sample >= sounddata_length) {
        if (sample == sounddata_length + lastSample) {
            stopPlayback();
        }
        else {
            if(speakerPin==11){
                OCR2A = sounddata_length + lastSample - sample;
            } else {
                OCR2B = sounddata_length + lastSample - sample;
            }
        }
    }
    else {
        if(speakerPin==11){
            OCR2A = pgm_read_byte(&sounddata_data[sample]);
        } else {
            OCR2B = pgm_read_byte(&sounddata_data[sample]);
        }
    }
    ++sample;
}

void startPlayback() {
    pinMode(speakerPin, OUTPUT);

    ASSR &= ~(_BV(EXCLK) | _BV(AS2));

    TCCR2A |= _BV(WGM21) | _BV(WGM20);
    TCCR2B &= ~_BV(WGM22);

    if(speakerPin==11){
        TCCR2A = (TCCR2A | _BV(COM2A1)) & ~_BV(COM2A0);
        TCCR2A &= ~(_BV(COM2B1) | _BV(COM2B0));
        TCCR2B = (TCCR2B & ~(_BV(CS12) | _BV(CS11))) | _BV(CS10);

        OCR2A = pgm_read_byte(&sounddata_data[0]);
    } else {
        TCCR2A = (TCCR2A | _BV(COM2B1)) & ~_BV(COM2B0);
        TCCR2A &= ~(_BV(COM2A1) | _BV(COM2A0));
        TCCR2B = (TCCR2B & ~(_BV(CS12) | _BV(CS11))) | _BV(CS10);

        OCR2B = pgm_read_byte(&sounddata_data[0]);
    }

    cli();

    TCCR1B = (TCCR1B & ~_BV(WGM13)) | _BV(WGM12);
    TCCR1A = TCCR1A & ~(_BV(WGM11) | _BV(WGM10));

    TCCR1B = (TCCR1B & ~(_BV(CS12) | _BV(CS11))) | _BV(CS10);

    OCR1A = F_CPU / SAMPLE_RATE;

    TIMSK1 |= _BV(OCIE1A);

    lastSample = pgm_read_byte(&sounddata_data[sounddata_length-1]);
    sample = 0;
    sei();
}

int wakePin = 2;

void setup(){
    pinMode(wakePin, INPUT);
    pinMode(ledPin, OUTPUT);
    
    
    attachInterrupt(0, wakeUpNow, LOW);
    
    startPlayback();
}

void loop(){}
void wakeUpNow(){
    startPlayback();
    sleepNow();
}

void sleepNow() { 
    set_sleep_mode(SLEEP_MODE_PWR_DOWN); 
 
    sleep_enable();    
    attachInterrupt(0,wakeUpNow, LOW); 
    sleep_mode();            
    sleep_disable();
    detachInterrupt(0);
} 

The finish
Some finishing touches, and it's done!