Sunday, 27 March 2022

BBQ Grill Tray Handle

With the barbecue grill that I made, I found that I would finish grilling and then want to use the fire pit - which meant that I would need to remove the grill whilst it was still hot.

This gave me an idea for another welding practice project.


Grill tray handles are simply handles which clamp onto the edge of an oven tray so that it can be moved whilst it is still hot.


Basically I intend to make the same thing for the grill. 

Using some left over angle bar from the grill, the plan is to create a C-shape, with a bit of flat bar for the lip.

This will latch onto the angle bar that creates the frame of the grill.

This will be connected to a rebar handle, which will provide some mechanical retention by being put through a drilled hole in the angle bar (the translucent bit in the diagram).

I turned some ash wood to go over the rebar, and secured it by welding a thread from a bolt to the back of the rebar, and adding a washer and end nut to secure it in place.


Sunday, 27 February 2022

Flip-top bench for garden storage

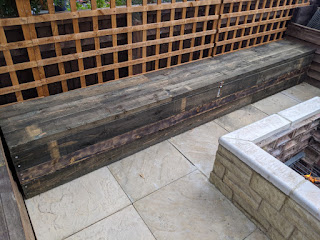
Building on from the last fire-pit/patio project, the reason that I was not too worried about the mismatched slabs at the back of the firepit patio was because I knew that the aim was to put some bench seating there which would cover them over.

The slabs at the back were a mix of different styles and sizes to just provide a solid base and gap-fill


This project is to build that bench seating.

It will also serve as the new "shed", with a flip top lid where garden tools and such can be stored without needing an actual shed.

The width of the patio between the planters at each end is approximately 12 ft.


While it would have been possible to to get single lengths of timber that would cover the full distance, obviously this would look rather basic. 


Instead we settled on 8ft lengths which would allow us to create a staggered joint similar to that of brickwork, making a much more aesthetically pleasing finish.

We also opted for 2" thick lengths to prevent warping, and add weight and sturdiness.


The height and depth of the bench are based upon the measurements of existing regular garden benches that we already had, so we can be confident that they provide a good seat height. (~16-18 inches).

This is why the there is a mix of 4" and 6" wide.

The open lid and gas strut
(before burning)

The remaining lengths of timber were used to create supports on the inside of the bench, where each of the lengths were joined.


The lid/seat was mounted with 3 shed hinges. Obviously a lid of this size is quite heavy, so to aid lifting it, two boot-lid gas struts from a scrap car were mounted, one at each end.


The closed bench, showing the latch
(after burning)

A latch and padlock was also added, recessed into the front (so that it didn't catch peoples legs when sat down.)


Finally there was a colour difference between the 4" and 6" wood - the 4 being much lighter, so it was burned with a blowtorch so that it would fit in better.


Friday, 17 December 2021

Dolce Gusto Genio2 Coffee machine repair

Last year, I was given a Dolce Gusto Genio2 coffee machine for repair.
The owner reported bad water flow, and said that they had attempted to clear limescale, etc using citric acid with no luck, and suspected that the pump was dying.

A quick search showed that there’s an unclogging pin tucked away between the water tank and the machine body. Using that I simply unclogged the nozzle and it worked fine. There’s a good lesson there about trying the simple things before jumping to more complicated conclusions.

Once fixed the owner gave it to me, as they’d already got a new one.

"Before"


Given the wasteful nature of the pod-based machines, and the reputation of the company behind them I took great pleasure in my free coffee machine which I then got some reusable pods for - so despite using one of their machines, I have managed to avoid becoming part of their ecosystem.


The main PCB - the bottom connector leads to...

Recently though the machine broke again a couple of times when turning on the lights would blink several times and then go out - shortly after it would just not turn on at all.

I pulled the machine part. iFixit have a good guide to getting the machine apart, so I won’t rehash that here.

After some testing with the multimeter I narrowed the problem down to to the PCB with the power button and the light on.


... the LED fill level board,
which in turn links to the power button board.


It appears that of the three pins, pin 3 is the power, with pins 1 and two being the return line for the red and green LED respectively.

When picking around with the multimeter some more I accidentally shorted pins 1 and 3 and the machine started up, so it seems that the button shares wires with the lights.

With this information in hand further testing indicated that it was the button itself that was faulty.

Unfortunately, there is not an awful lot of space in case for a replacement button - only approximately 2mm. I did not have a button that would fit, but seeing as I cared more about getting coffee then the aesthetics of the machine, I did the next best thing and drilled the hole through the case running wires to the relevant pins.

Then I attached an external button. One that has an integrated LED back light. It is any a single colour though, so I wired it in place of the green LED, so that the button being lit is indicative of the machines ready state.

Then I put the machine back together, and tested to confirm it works.
It's not the most stylish of alterations, but I had no intention of getting another machine, so it was either this or start getting used to instant coffee again.

After


Sunday, 17 October 2021

BBQ Grill and Coal Tray for the Firepit

BBQ Grill


This project doesn't look like much, granted. However it's a bit of a milestone for me as it's the first real welding project I've done.

It's pretty basic - a frame made of angle iron with bar stock as support, with a steel mesh as the grill itself. The mesh is sandwiched in place to the frame by bar stock - because the mesh itself was too thin to weld (at least, not at my current skill level.)

The cross section looks like this:


The welding was done with flux-core wire (FCAW - Flux Core Arc Welding, sometimes also known as 'gasless MIG')

Although the welds aren't the prettiest, particularly due to the spatter from the wire (lesson learned - use anti-spatter spray), the frame is plenty strong and sturdy enough for it's purpose, and has been used for several barbecues already.

Coal Tray

 
Because the firepit itself is quite deep, it's not practical to have the coals at the bottom of the pit - they're too far away from the grill. It's also a good idea to have more control over what is being burned when cooking food, so having a separate tray makes sense.

I made this quick tray from aluminium that was left over from the greenhouse that was removed earlier this year.

I had read a few articles warning of aluminium use in food because of health concerns, but this a) seems to relate more to food in direct contact with the aluminium and b) aluminium foil is extensively and commonly used, so one would expect there to be a bigger outcry about it if there was anything to worry about.

Some other aluminium parts from the greenhouse were used to create legs for the tray so that it stands a couple of inches blow the grill.

Thursday, 23 September 2021

Fast forwarding boring parts of games

It's becoming more common in gaming, particularly with mobile and free-to-play games, for an action or activity to be limited by real-world time, usually in order to provide a 'nudge' to players to nag them into purchasing loot-boxes or other pay-to-win premium extras.

Moral arguments about the ethics of pay-to-win and loot boxes aside, I find this really annoying. These days, the amount of time that I have available for gaming is ever lower, and arguably, time is the most valuable and scarce resource for everyone - after all, we only have get a certain amount, and can't buy more.

So while I was waiting for some in-game nonsense to finish, I started thinking about how feasible it would be to create a fast-forward for these types of activities in-game.

Yeah, I know, there's a certain irony in getting annoyed at having my time wasted and then spending a good deal of time trying to work around it - but sometimes once I get an idea in my head, I have to see it through.

The game I'm using for this demo is Fallout Shelter. I'm well aware that there are already plenty of documented save file hacks for this game, similar to the Saints Row 3 one that I did a while ago.

However, that's not the approach that I want to take here. I still want to play the game, more-or-less as intended. I just don't want to be kept waiting.

A quick experiment by changing the time on the system the game is running on, shows it to be quite tolerant of the time changes, the screen briefly blacking out while the game mechanics catch up.

The first thing to do is to disable NTP (automatic system time synchronization).


In Windows, this can be done by right-clicking on the time in the task bar, selecting "Adjust date/time", and then setting "Set time automatically" to Off. This will stop the system resetting the clock back to the correct time. Just remember to turn it back on when you're done playing.

To do the time adjustment, I'm using AutoHotKey. AutoHotKey (AHK) is an incredibly versatile scripting language for Windows systems, allowing commands and key macros to be bound, system-wide, to keyboard shortcuts.


The idea is to create a global hot key on the system that I can trigger without leaving the game, whenever I want to speed things up by a certain amount.

As the game is mostly touch/mouse controlled, I've bound the macro to the modifier and arrow keys.

* Ctrl-Shift-Right advances time by 1 minute
* Ctrl-Shift-Left advances time by 15 minutes
* Ctrl-Shift-Down advances time by 30 minutes
* Ctrl-Shift-Up advances time by 1 hour

The script is available on GitHub.


Limitations

The script needs to be run as administrator, as elevated privileges are needed to change the system time. There are ways that this can be avoided, but they require more system changes, so for the purposes of this, it's easier to just right-click and select "Run as Administrator".

The script is pretty basic, and operates simply by adding the numbers - so it's not smart enough to cross hour-thresholds - ie. if you advance by a minute at 11.59, it will attempt (and fail) to set the time to 11.60 - but this is simply overcome by, well, waiting a minute.


Thursday, 9 September 2021

Late 1940's / Early 1950's Zippo Restoration

Taking a break from all the DIY-heavy home improvement projects, I found this rusted out Zippo lighter at a flea market.

I've always been a fan of Zippos, their style (and that unique sound) is incredibly iconic, so I figured I'd have a crack at restoring it.

Plus I still have a bunch of spares left over from the trench lighter project I did a while back.

Before starting, I did some research to try and put a date on the lighter, just in case it was something super-rare.


The first thing to so is to check the stamp at the bottom of the case:

According to the table provided by Zippo themselves, based on the logo type and the patent number, this lighter was manufactured in the 1937-1950 date range.

Digging through some other online resources, I found that it could be dated further by the chimneys number of holes, and the pattern of the flint wheel.

Depending on the source, the chimney having 8 holes per side dates it as being from late 1946 or 1947 onward.

The diagonal-cut flint wheel puts it also at 1946 onward.

Finally, the hinge (again, depending on the source), puts it at either 1948 or 49 onward

So between all that, it looks most likely that this lighter was produced between 1948-1950.

It's pretty cool to know the lighter has some history to it, but it doesn't make it a massively rare artefact.

Removing the rust

The rust on one side in particular was quite thick. To remove it I started with a small rotary tool wire wheel, then moved to some high-grit sanding discs, before some wet and dry sanding by hand to even out some scratches, finally finishing up with a number of passes with the buffing wheel and polishing compound.

As much as I am trying to preserve the original chromed finish, it was clear even before starting that it had worn through in places - I was merely trying to not make it any worse.

However with that lot done, although it's not exactly 'showroom' quality, the lighter has it's shine back, but retains a lot of it's characterful aging which suits it's age.


Flints & Wicks

The obvious thing to note is that it's not functional. To start with, there was no flint to make a spark. Thankfully the flint spring was still there, so adding one of my spares was all it took to get it sparking again.

The wick had been worn down to nearly nothing as well. I thought that I would likely need to replace it, so had a spare to hand, but it appears as though there was still plenty of wick remaining to pull through. It's quite possibly that the previous owner just never knew to do this - or had lost the flint before it was an issue.

Then all that was left was to add fuel, and:


Thursday, 26 August 2021

Woodstore / Planter from reclaimed wood (old shed)

After finishing the upcycled planter by the firepit, I realised that something similar would be useful as a wood store for the firepit, and would also help define a boundary to the patio and fire pit area.

Looking through the remaining timber from the shed, there was still the shed floor, and the second long wall to use, and the short (back) wall

These formed the back and front of the second planter, with the back wall being split into 2 lengths to provide the sides, in mostly matching dimensions to the first planter.

To help keep the wood dry, the shed door and it's hinges were repurposed. The thing is, the planter is around 8 foot long, and the door only 6.

To overcome this, it's split into 2 sections, with a divider made from part of the shed front. The 6 foot section with the lid is the woodstore, and the remaining 2 foot section was lined out with plastic to create another planter, in the same manner as the first planter.

The idea is that this will house climbing plants to grow along the trellis that has been installed on the fence at the back of the patio.

The door had to be trimmed down as the planter was narrower, and the hinges had to be switched to the opposite side. A bit of scrap chain (left over from the light fitting project), and an odd carabiner clip I had lying around, were looped around the tree to provide a latch to hold the lid open when needed.


Bonus Planter

That was meant for making planters. But, when I set out with all these garden builds, I did set a 'zero-ish' waste rule. And when the bricks were delivered, they came in a wooden crate, which would then need disposing of.

Plus there were a few miscellaneous bits of shed panel left, which were otherwise just going to be firewood.

So I quickly whipped up a third mini-planter to go out on the front lawn. It's pretty rough and ready, but will serve it's purpose, at least for now and until I have more definite plans of the work I want to do out front.


The bonus planter, just needs top soil and plants